How do you take real estate photos with an iPhone? Turn on the grid and level, clean the lens and leave HDR on. Turn on every light and open the blinds. Hold the phone level at about chest height in a corner, use 1x where the room allows, and lock exposure on a mid-tone wall. Shoot horizontally, then straighten verticals in Photos.
Apple menus, MLS photo rules and TINTY facts checked October 6, 2026.
We make TINTY, an AI virtual staging app, so we have a stake in one section of this guide: shooting empty rooms. The camera advice comes from Apple’s iPhone User Guide, four iPhone photo guides, the photo rules of two multiple listing services (MLS) and agents’ own threads. Tips without a named source are our own view.
Key takeaways
- Settings first: turn on Grid and Level in Settings > Camera, leave HDR and Lens Correction on, and pick a file format your tools accept.
- Use 1x when you can: the 0.5x ultra-wide fits more of a small room but stretches whatever sits near the edges.
- Height and corners: hold the phone level at about chest height, shoot from a corner and show two walls.
- Check your MLS: Canopy MLS takes JPEG only, up to 6 MB per photo. Bright MLS bans identifiable people, signs and logos.
- Virtual staging: shoot rooms empty, level and wide if you plan to stage them, and label every staged photo.
On this page: 8 steps · Settings · 0.5x lens · Height and angles · Light · Shot list · Empty rooms · Editing · MLS rules · Mistakes · iPhone or pro · What agents say · FAQ
How to take real estate photos with an iPhone in 8 steps
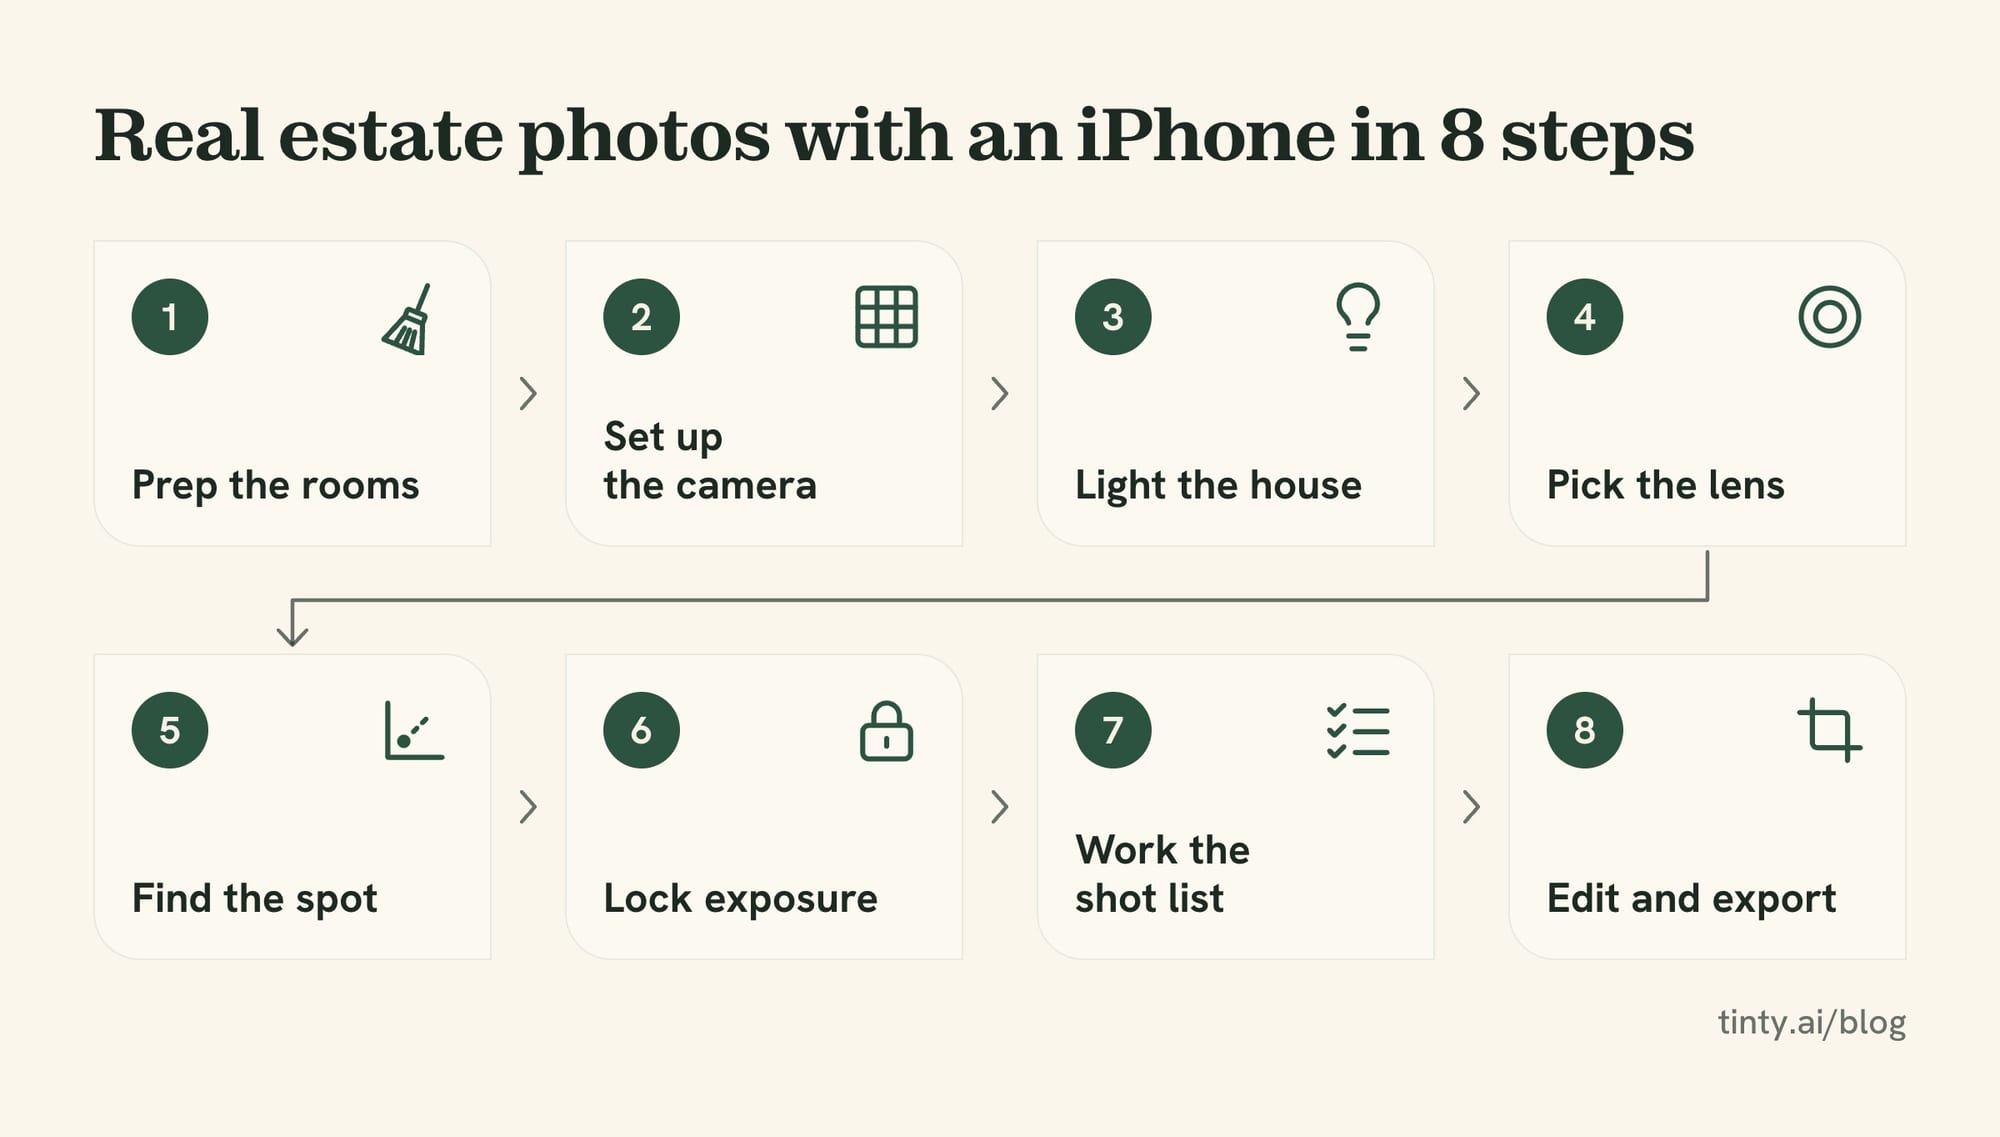
Taking real estate photos with an iPhone comes down to eight steps, done in this order. The steps are the same for agents and for owners who list their own home. Most have their own section below, with Apple’s menu paths where they apply.
- Prep the rooms. Declutter, clean and set each room first. Our photo day checklist covers that part.
- Set up the camera. Turn on Grid and Level, wipe the lens and choose a file format.
- Light the house. Turn on every light, open the blinds and stop the ceiling fans.
- Pick the lens. Use 1x where the room allows, and 0.5x only in small rooms.
- Find the spot. Stand in a corner, hold the phone at about chest height and keep it level.
- Lock exposure. Touch and hold a mid-tone wall until AE/AF Lock appears, then shoot.
- Work the shot list. Start with the front of the house, then the main rooms, kitchen, bathrooms and yard.
- Edit and export. Straighten verticals, check brightness and export files your MLS accepts.
Watch out: menus differ by iPhone model and iOS version. We checked Apple’s iPhone User Guide on October 6, 2026, when it covered iOS 27. If a toggle or the .5x button is missing, your model may not have it.
Gear: a tripod helps, extra lenses are optional
You need no extra gear for any of this. In our view, three add-ons are worth a thought:
- Tripod or phone clamp: keeps the height the same in every room and the phone steady in dim light. Pair it with Apple’s camera timer of 3, 5 or 10 seconds, so your tap doesn’t shake the phone.
- Clip-on wide lenses: HDRsoft’s and AHRN’s guides suggest them. We didn’t try any, so on models with an Ultra Wide camera, we’d start with the built-in 0.5x lens and Lens Correction.
- Camera and editing apps: AHRN’s guide suggests real estate camera apps and photo editing apps. Apple’s Camera and Photos apps cover the shooting and editing steps in this guide.
iPhone camera settings for real estate photography
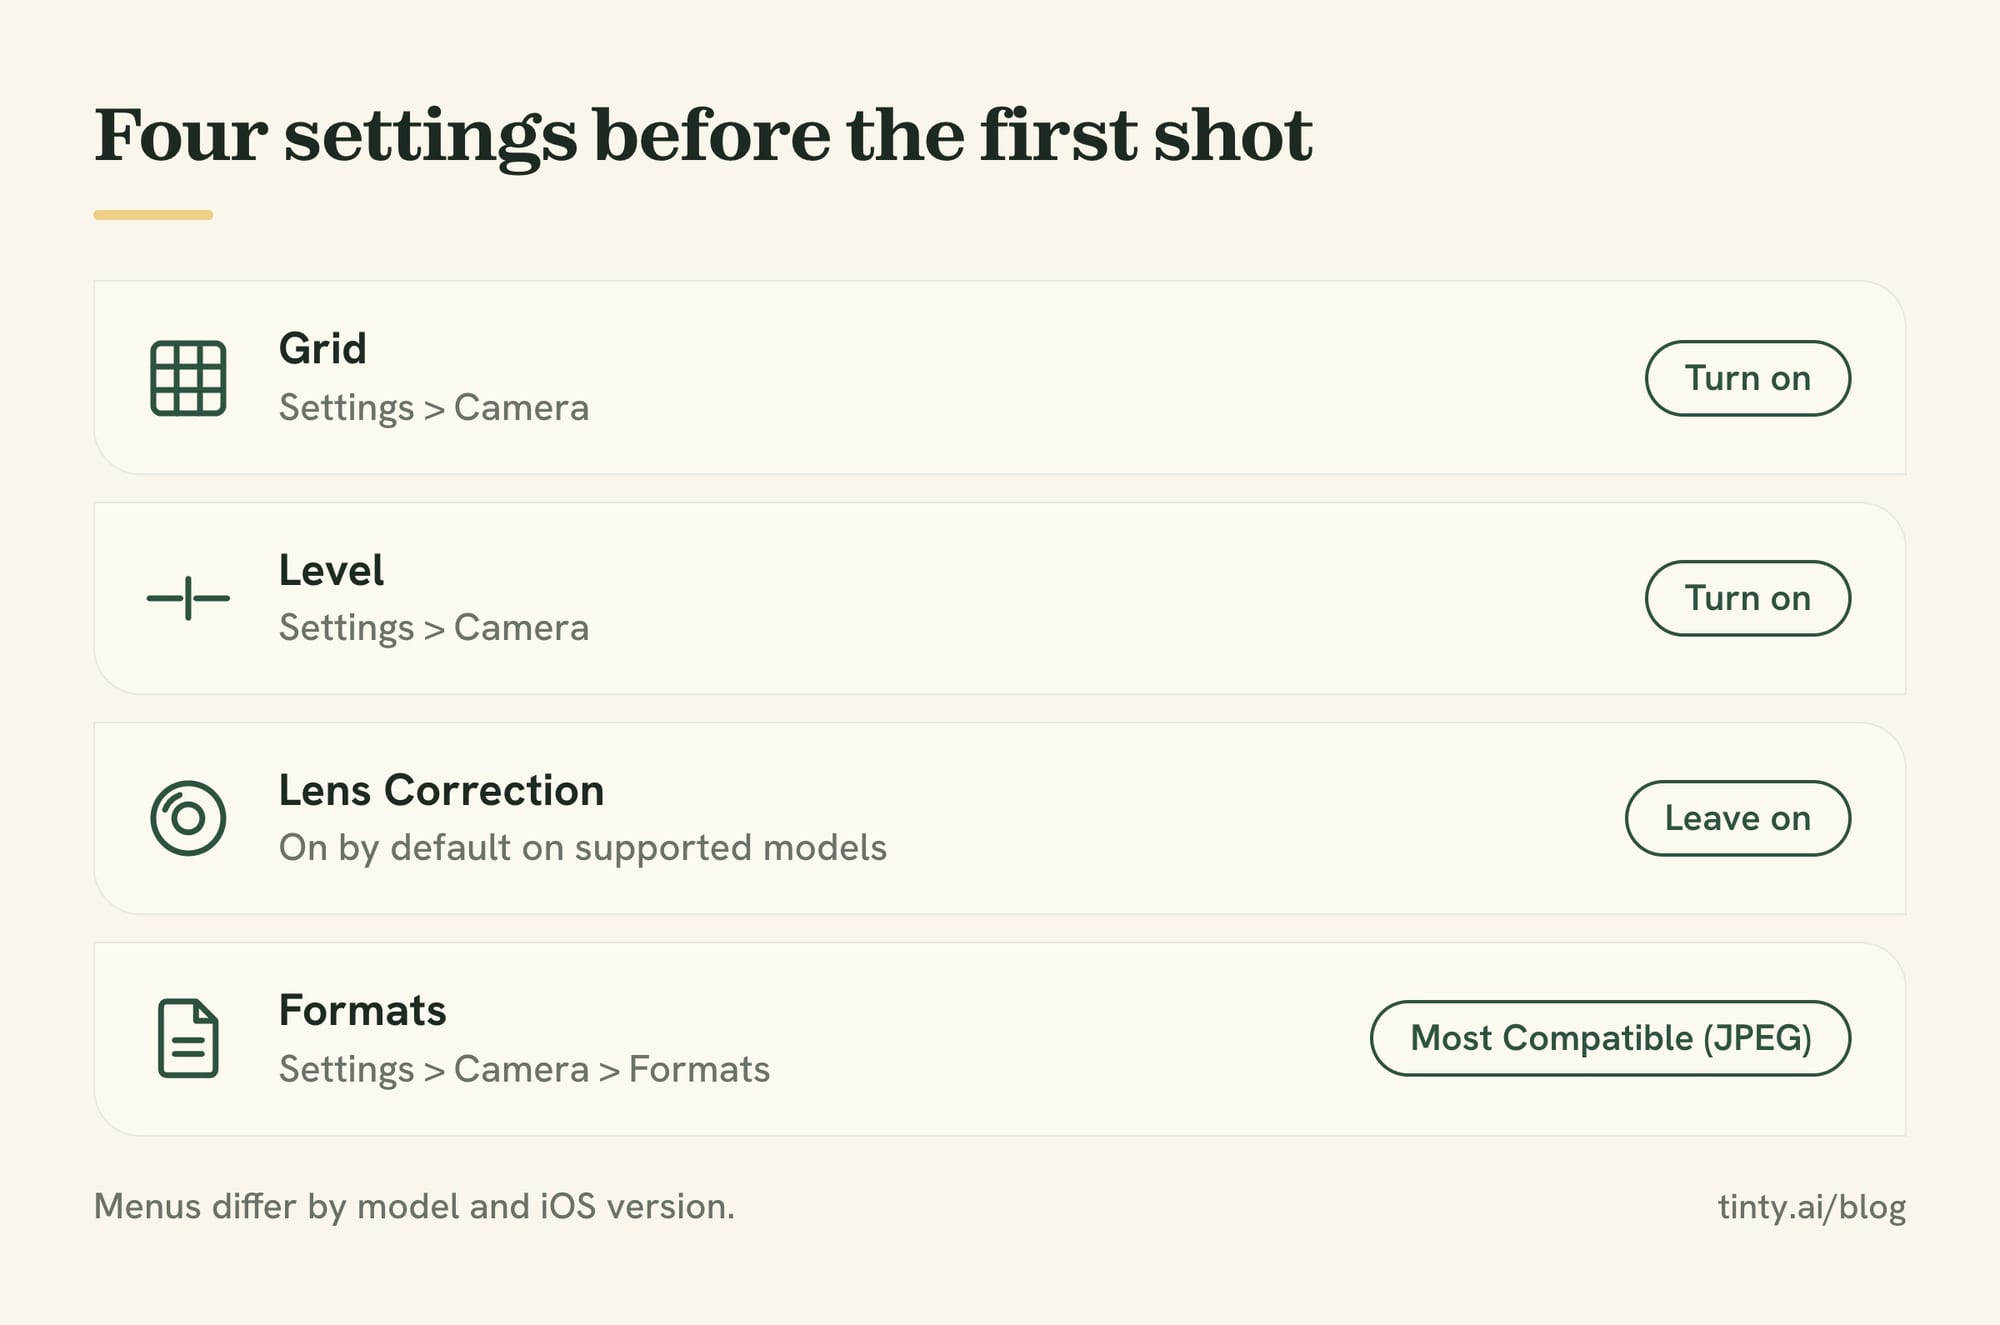
Check four settings before the first shot: Grid, Level, Lens Correction and Formats. Apple documents all four, and in our view they matter most for iPhone real estate photography.
Grid and level: turn both on
Go to Settings > Camera and turn on Grid and Level. Apple says they help you straighten and compose your shot. The grid gives you lines to hold against door frames and wall corners.
While you’re there, wipe the lens with a soft cloth. On supported models, iPhone detects a smudged lens and suggests cleaning it.
HDR and exposure: let HDR work, then lock exposure
Let HDR work. Apple says the camera takes several photos at different exposures and blends them, and it uses HDR by default when it’s most effective. That blend helps hold detail in a bright window and a darker room in one frame.
On most recent models there’s no HDR switch to find. Only iPhone 11 models, iPhone SE (2nd generation) and iPhone 12 let you turn Smart HDR off in Settings > Camera.
Then set exposure yourself. Tap the screen where you want focus, and drag up or down next to the focus area to brighten or darken. To keep that setting for the next shots, touch and hold until AE/AF Lock appears. Tap the screen again to release it.
Tip: lock exposure on a mid-tone wall, one that’s neither bright nor dark, not on a window or a dark corner. A window makes the room go dark, and a dark corner blows the window out to white.
Skip filters and strong Photographic Styles. Apple notes that a style applies to every photo you take until you change it or close Camera, so one tinted style would color the whole listing.
File format: JPEG, HEIF or ProRAW
Your format decides whether other tools can open the file. Apple’s Formats menu, under Settings > Camera > Formats, offers these options:
- High Efficiency: saves HEIF files, which Apple says use less space at the same visual quality.
- Most Compatible: saves JPEG, an older format that more devices and systems open.
- ProRAW: a separate toggle on Pro models. It gives more editing room but runs about 25 MB at 12 megapixels (MP) and 75 MB at 48 MP.
For most agents, Most Compatible (JPEG) is the simple choice, in our view. Canopy MLS, one regional MLS we checked, accepts only .jpg or .jpeg files, and TINTY takes JPG, PNG or WebP up to 10 MB. A ProRAW photo is saved as a large DNG file, which neither accepts until you convert it to JPEG.
Resolution matters less than you’d think. Canopy stores listing photos at 2,048 by 1,536 pixels, about 3 MP (our math). If you shoot High Efficiency, supported models let you drop the default from 24 MP to 12 MP in Settings > Camera > Formats > Photo Mode for smaller files.
The 0.5x ultra-wide lens and its distortion
Use the 0.5x lens for small rooms only. It fits more of the room into one frame, but it stretches whatever sits near the edges.
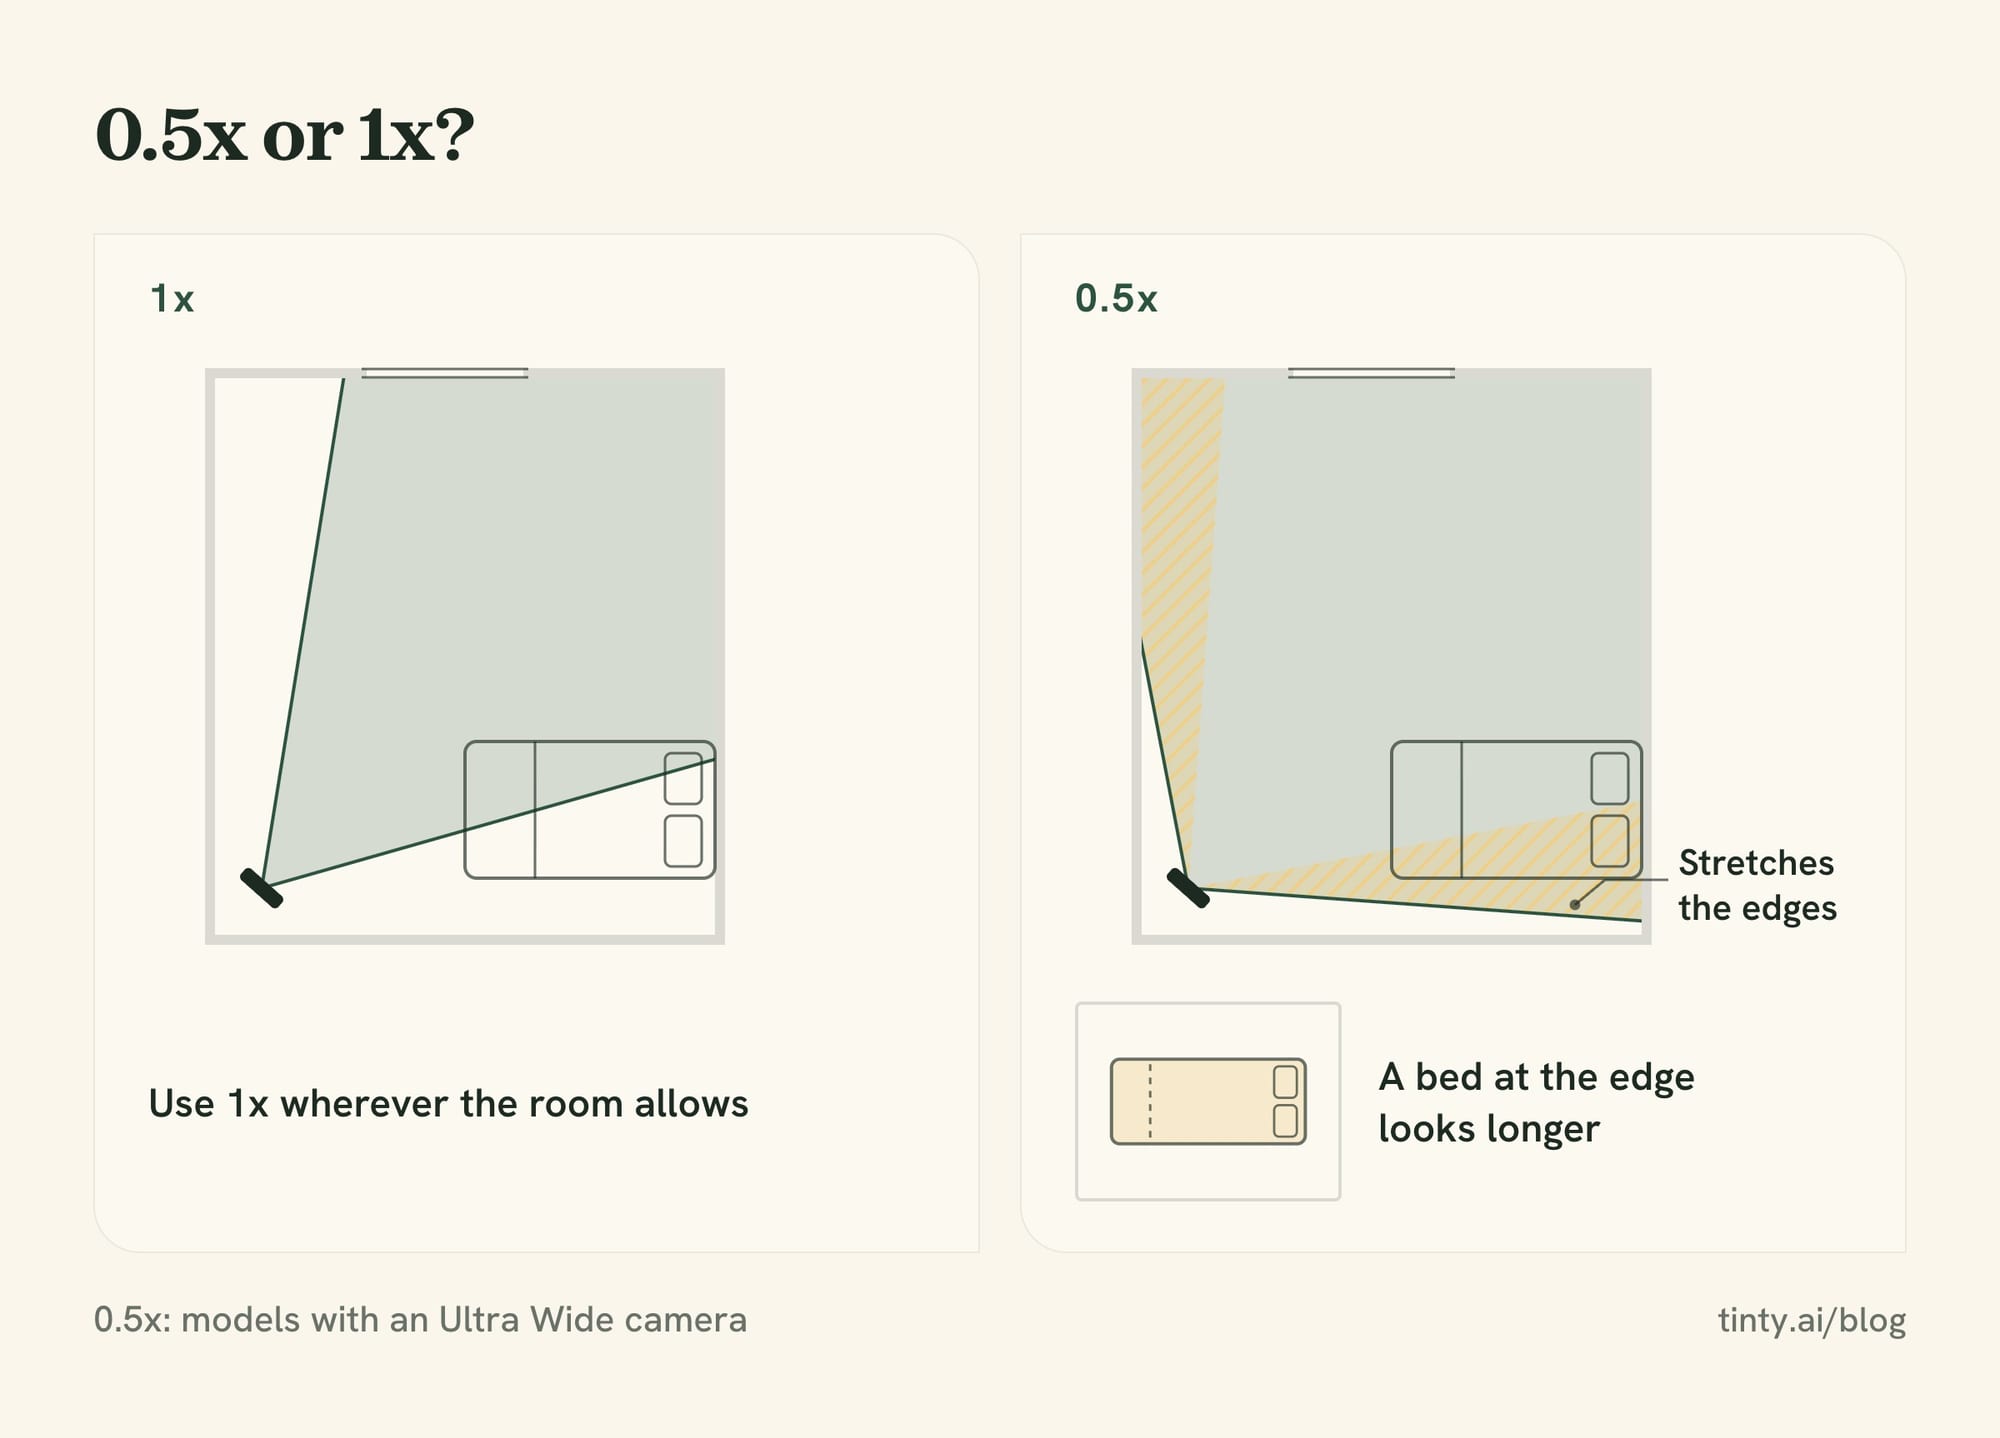
On models with an Ultra Wide camera, tap .5x at the bottom of the frame to switch to it, then tap 1x to go back. Without one, step back into a corner at 1x. Apple’s Lens Correction setting adjusts Ultra Wide photos “for more natural-looking results.” It’s on by default on supported models, so leave it on.
Which lens for which room, in our view:
- 0.5x: small bathrooms, laundry rooms, walk-in closets, galley kitchens and tight bedrooms.
- 1x: living rooms, open-plan spaces, primary bedrooms, the front of the house and detail shots.
- Step back first: if 1x can’t fit the room from the doorway or a corner, then switch to 0.5x.
Distortion is worst at the edges of the frame. A bed at the edge looks longer, and a chair near a corner looks wider than it is. Keep furniture away from the frame edges and keep the phone level, since tilting up or down makes walls lean (our view).
Watch out: a 0.5x shot of a small bedroom can make it look larger than it is. In our view, that sets up a disappointing tour. Pair each ultra-wide shot with a floor plan or room dimensions in the listing.
Camera height, level and the corner shot
Where you stand and how you hold the phone matter more than any setting, in our view. Get these three right and most rooms look true to size.
How high to hold your iPhone
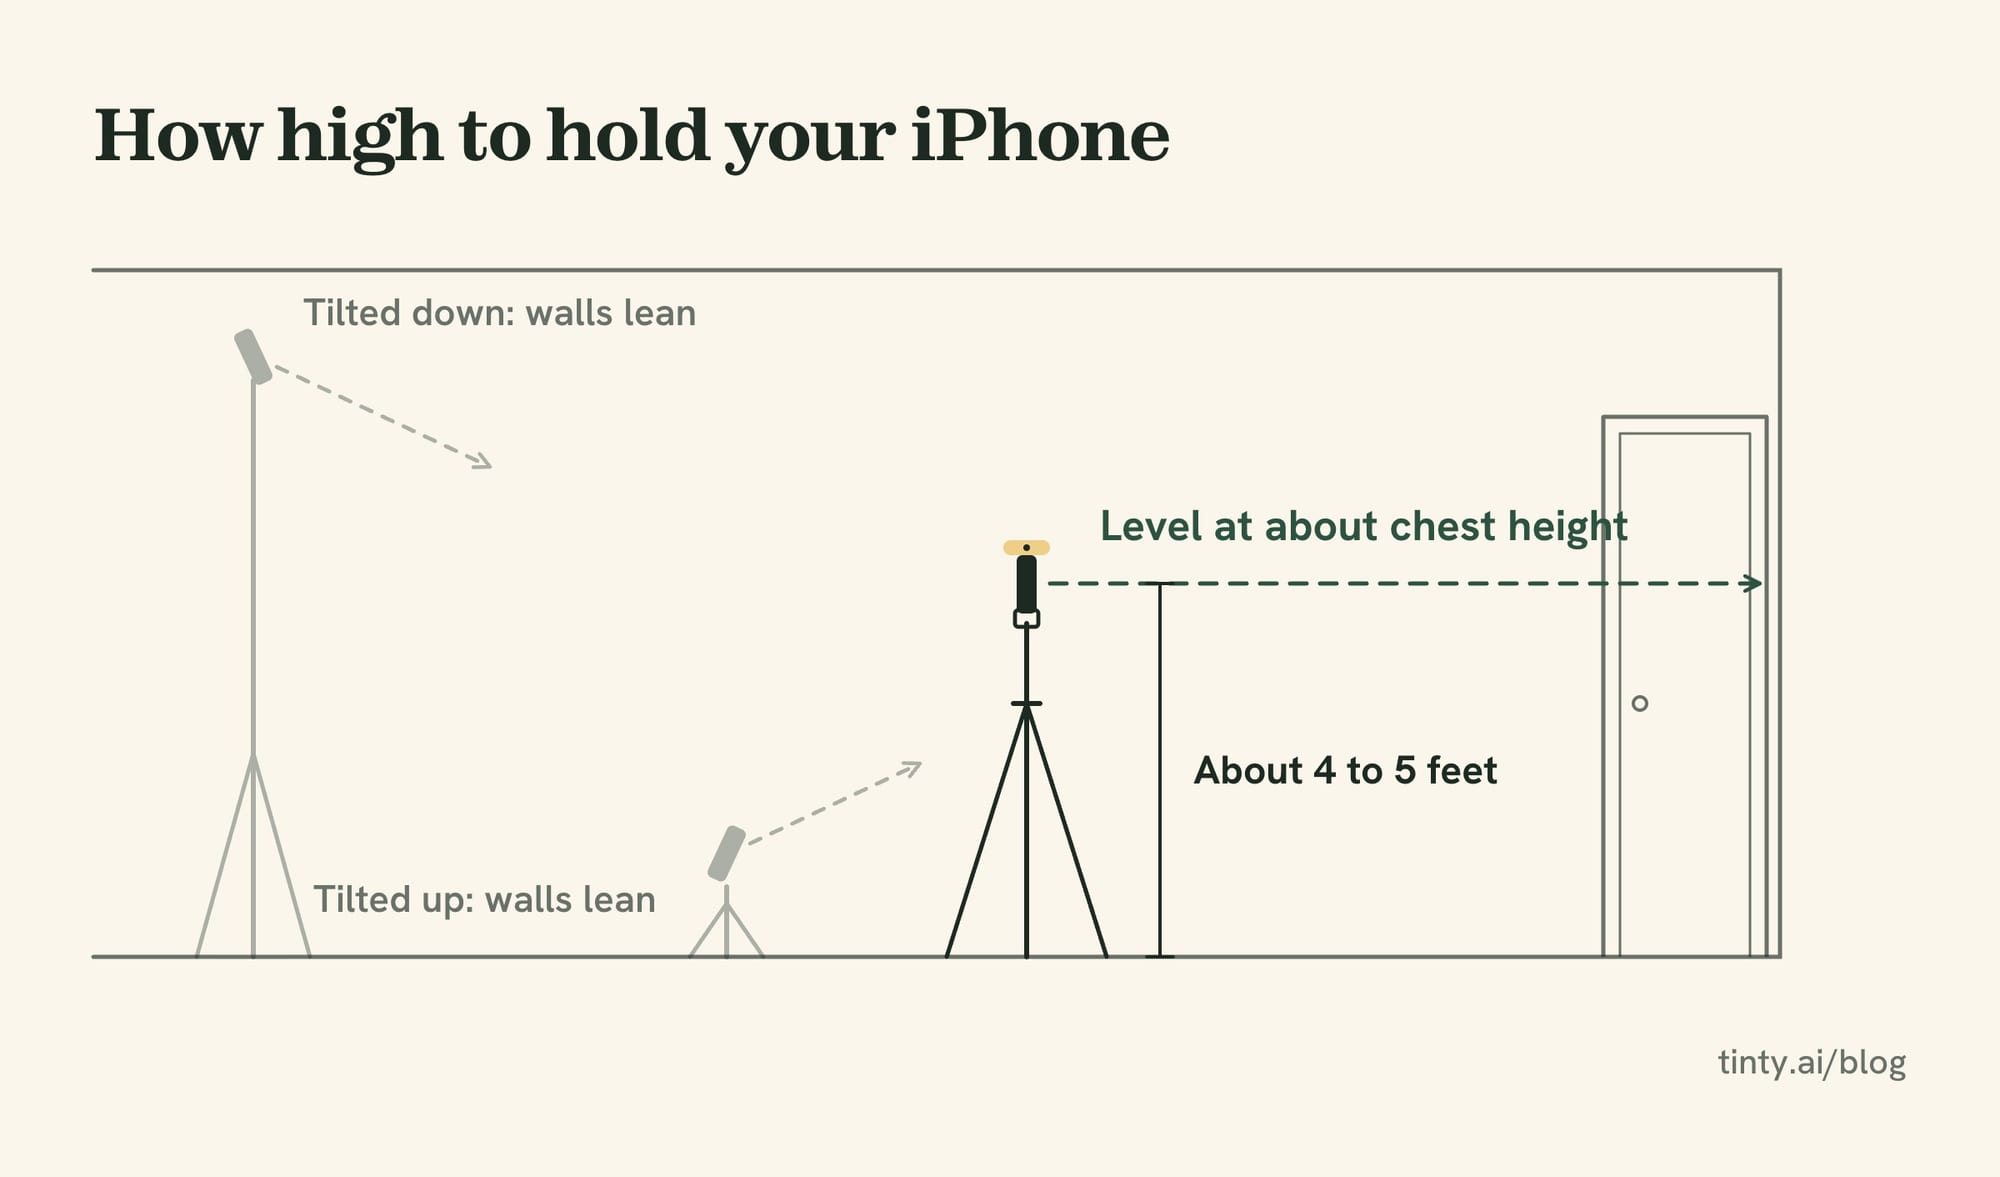
Guides disagree a little on height. ListWithFreedom’s iPhone guide says chest height, about 4 to 5 feet off the floor. HDRsoft’s guide says to hold it low, about belly high, or to kneel if you can.
Start at chest height, then go lower in small rooms (our view). Keep the same height through the house so the photos read as one set. A tripod or phone clamp makes that easy.
Keep vertical lines vertical
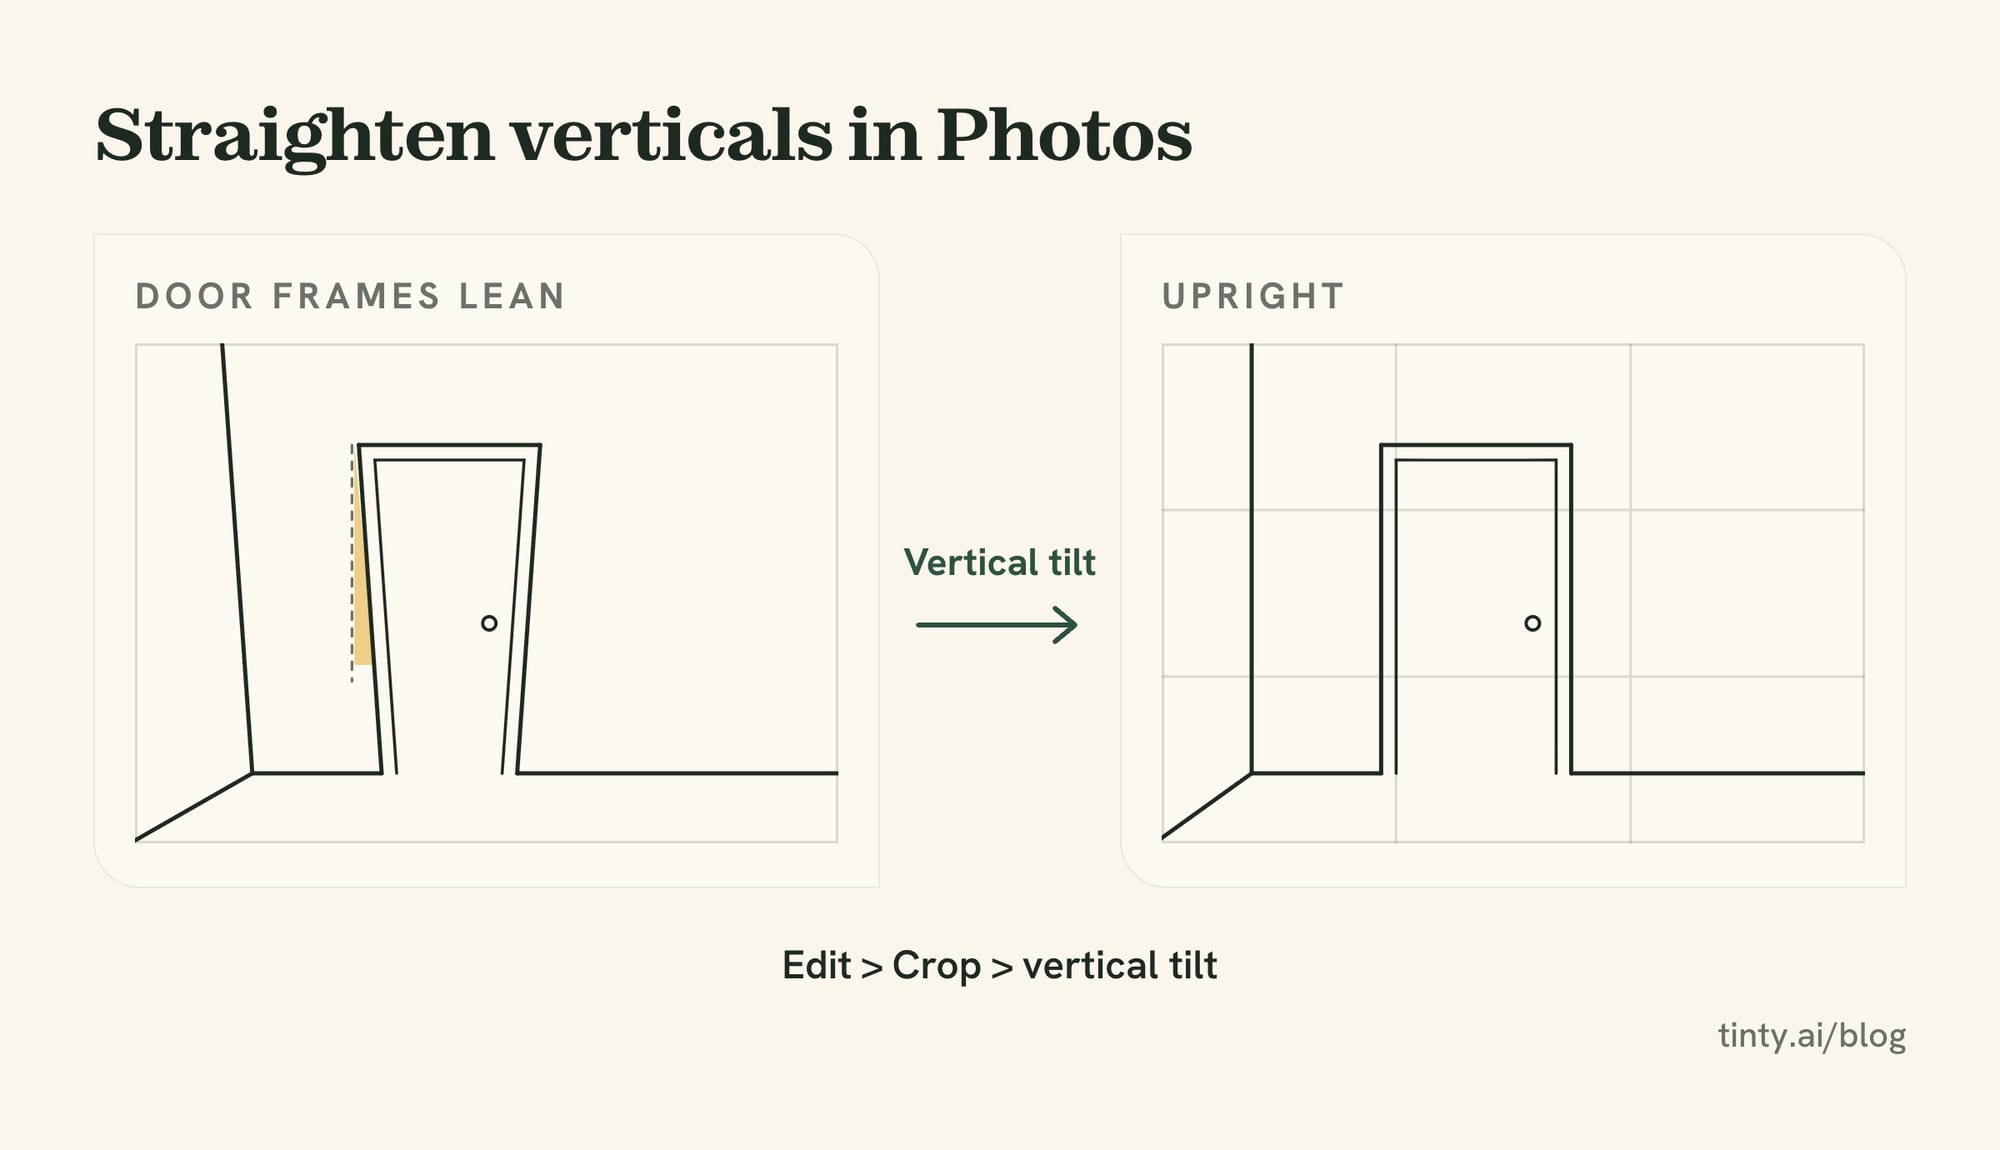
Point the phone straight ahead, not down at the floor. When the phone tilts, door frames and wall corners lean in the photo, and leaning walls are the quickest giveaway of a phone shot (our view).
Before each shot, line up a grid line with a door frame or wall corner and check the level. If a photo still leans, fix it later with the vertical tilt tool in Photos, covered in the editing section below.
Shoot from a corner and show two walls
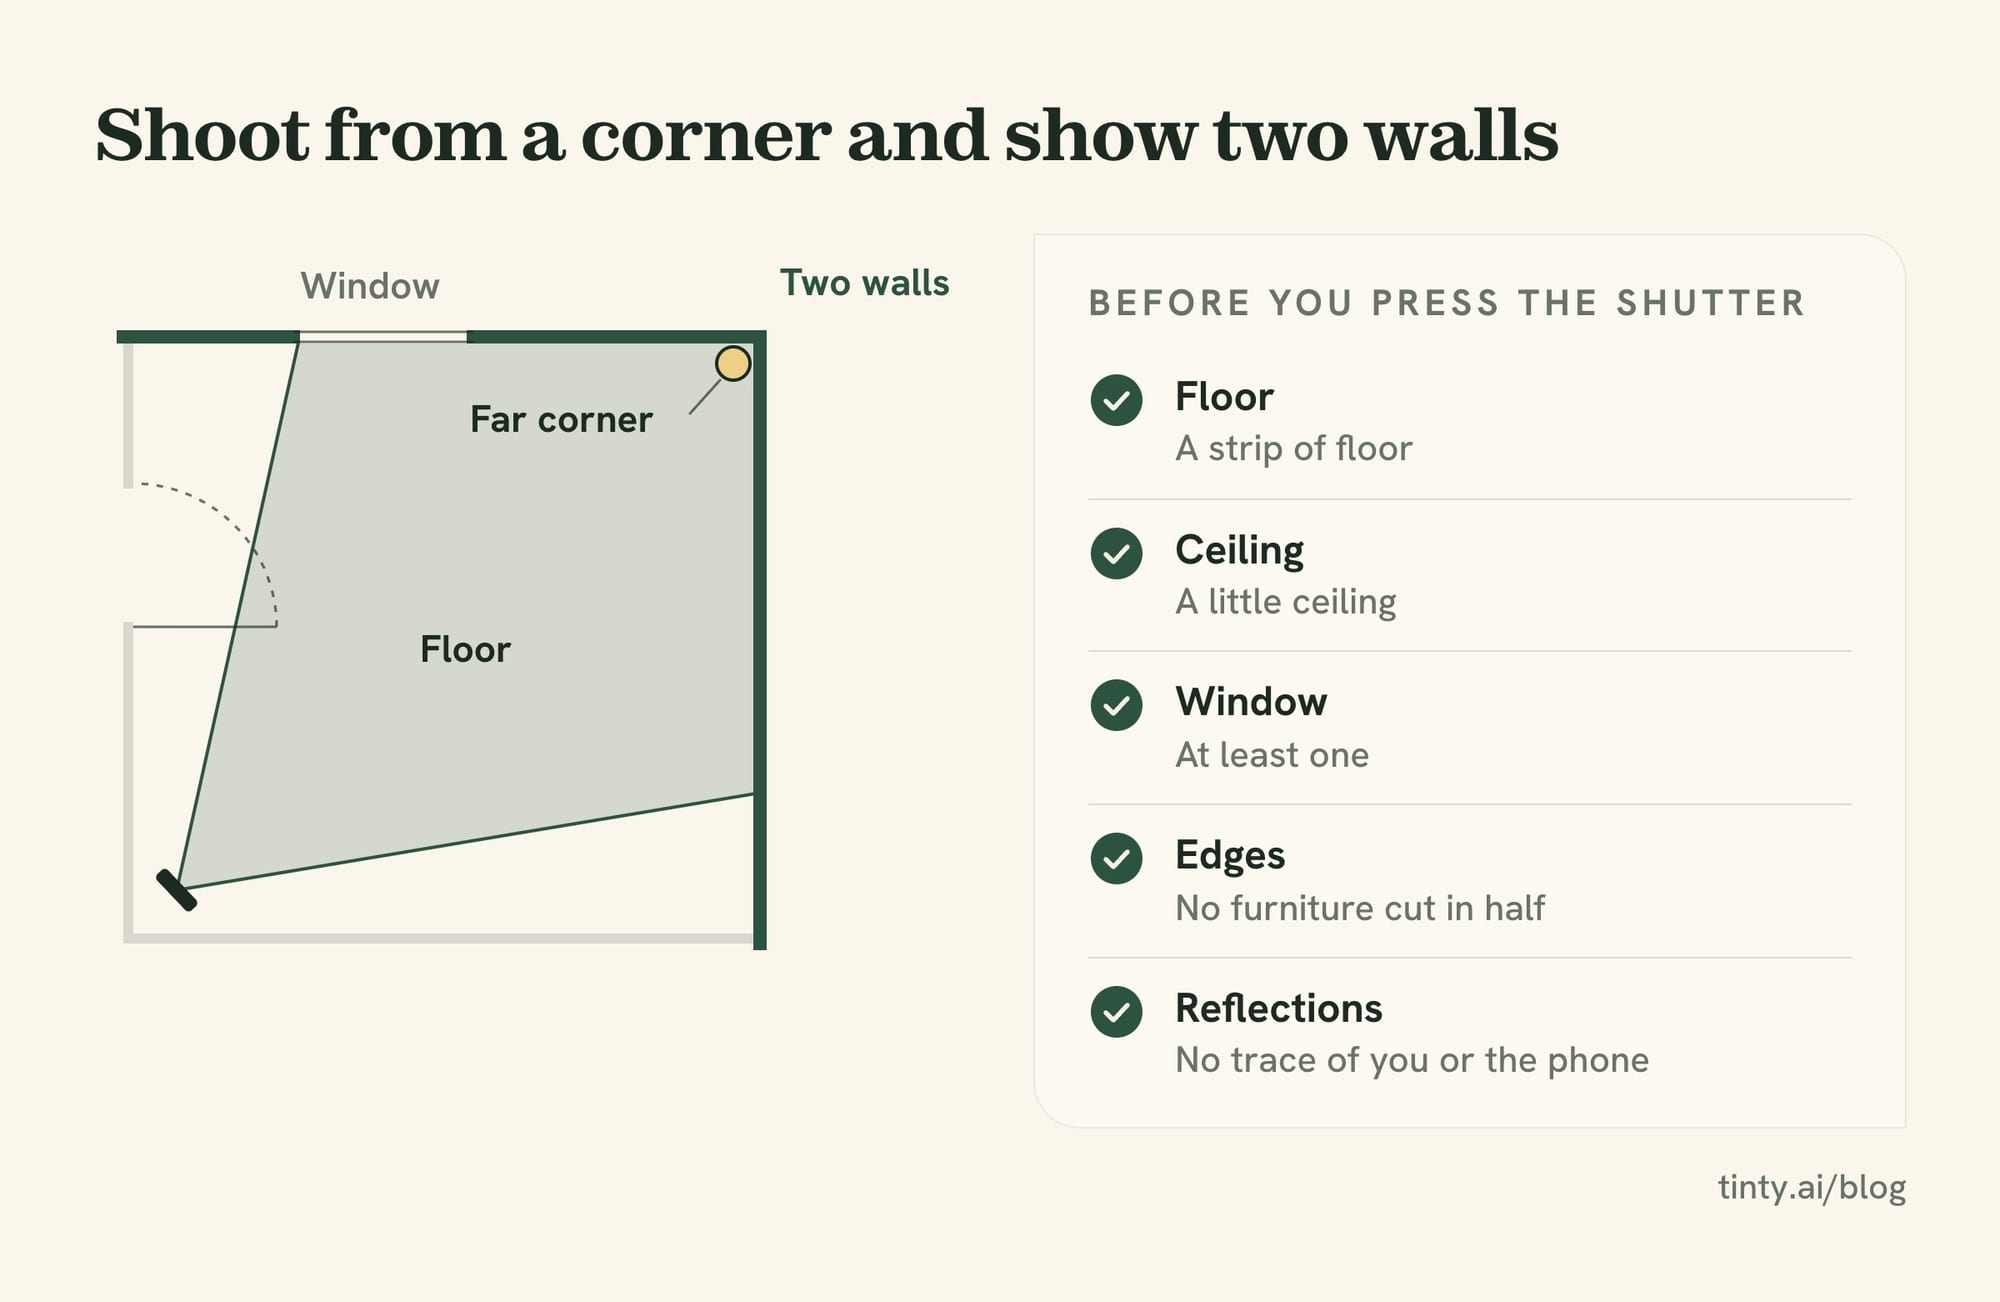
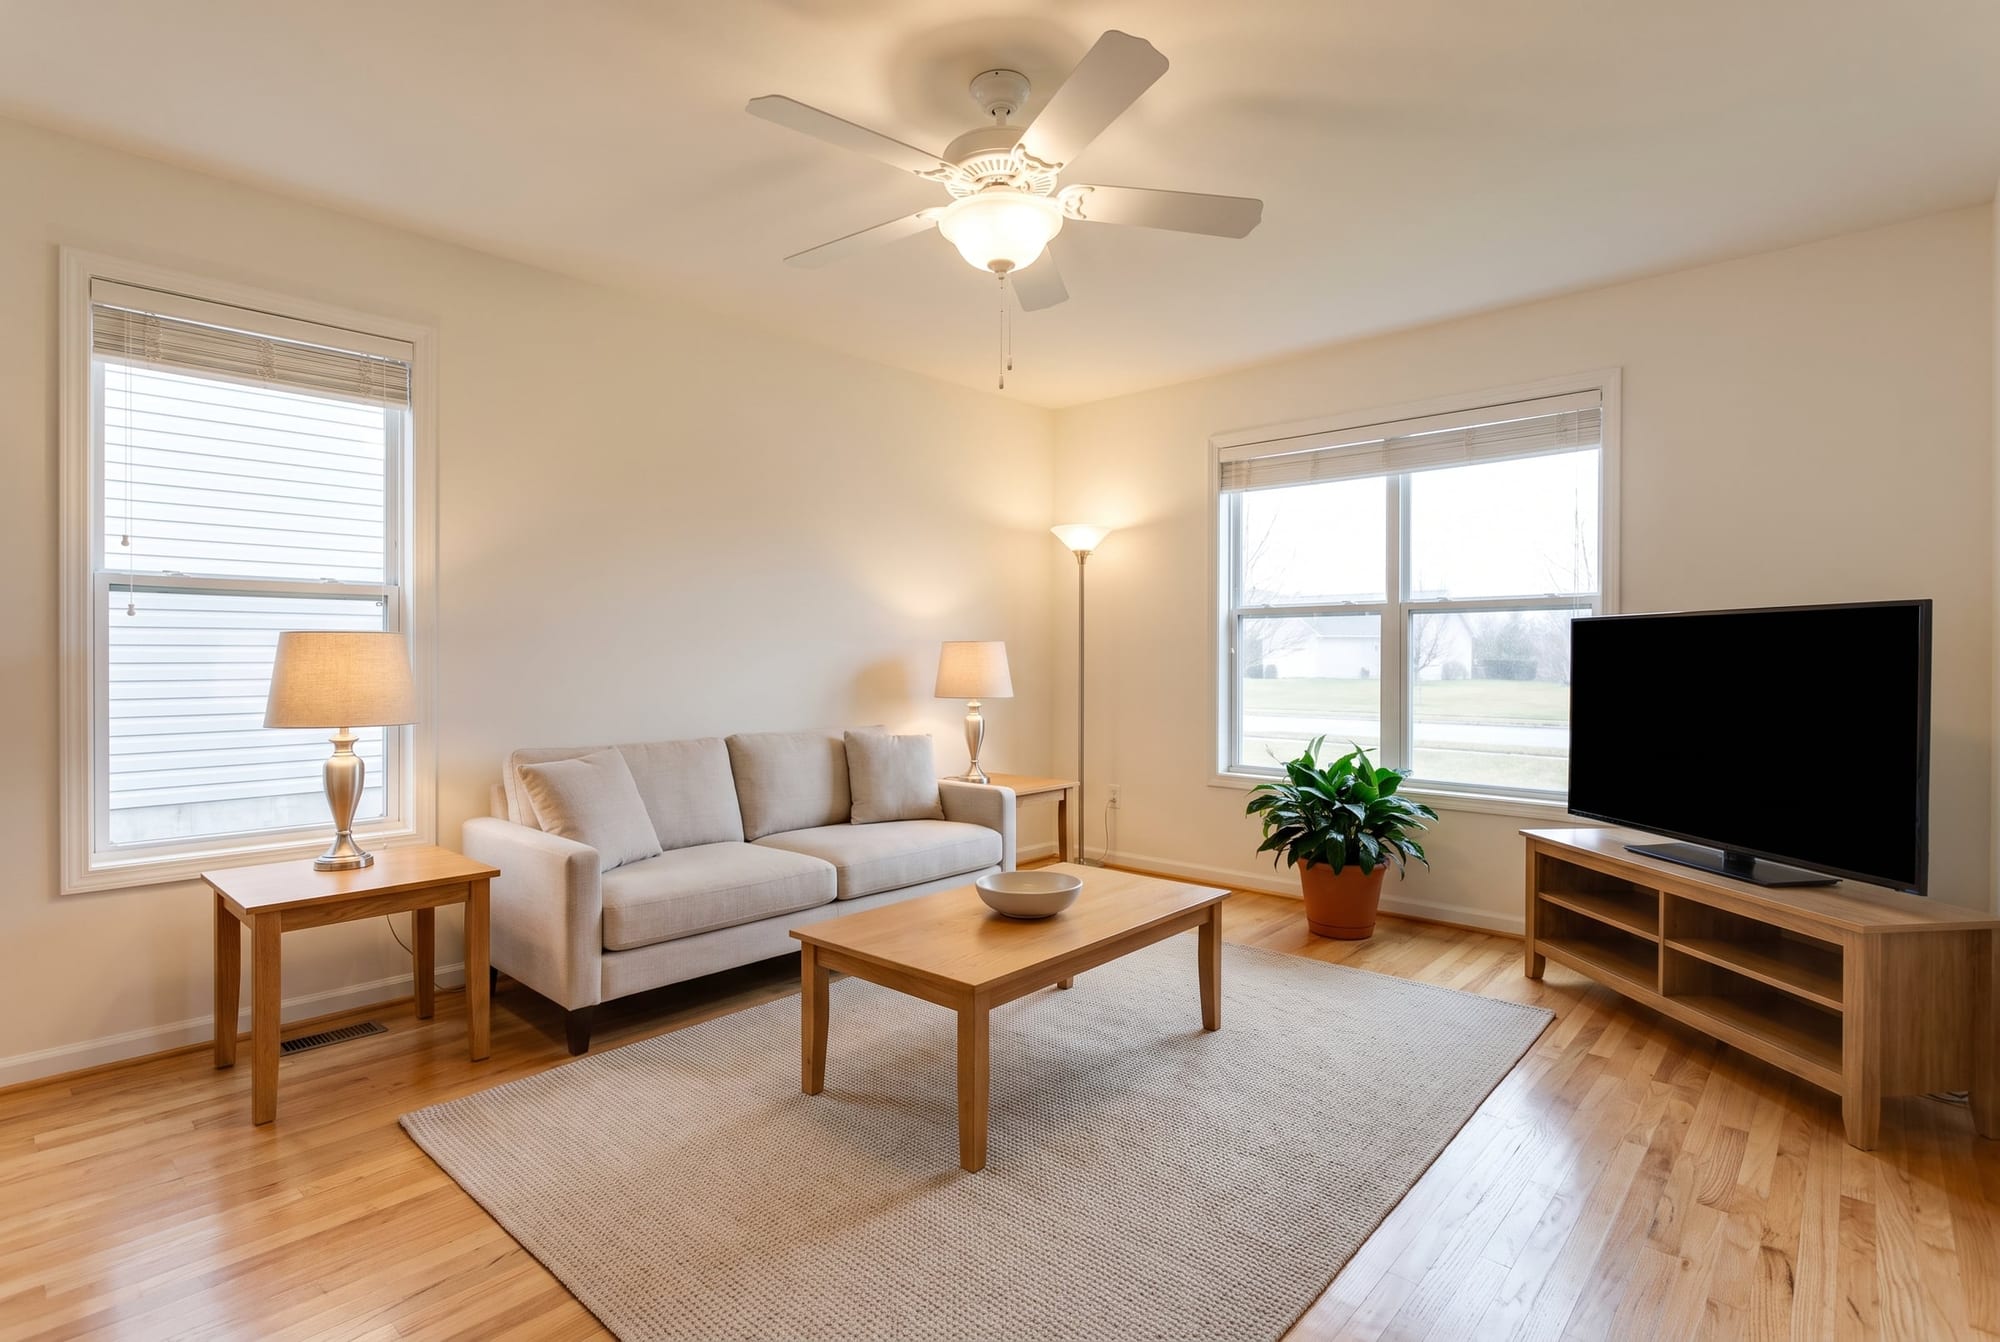
Stand in a corner or a doorway and aim across the room toward the far corner. That framing shows two walls, the floor and a window, which tells buyers the room’s shape. Shoot each main room from two opposite corners.
Before you press the shutter, check the frame for these five things (our checklist):
- Floor: a strip of floor in front of you, so buyers can judge depth.
- Ceiling: a little ceiling, never half the frame.
- Window: at least one, so the room reads as bright.
- Edges: no furniture cut in half at the edge of the frame.
- Reflections: no trace of you or the phone in mirrors, glass doors or TV screens.
Real estate photography tips for light
Light first: turn on every light and open the blinds. Most real estate photo tips start there, because light does more than any phone upgrade (our view).
BoxBrownie’s iPhone guide tells you to turn on all interior lights, open the curtains and blinds, and turn off ceiling fans to prevent blur. Run through the same routine in each room:
- Lights: turn on every ceiling light, lamp and under-cabinet light.
- Blinds: open blinds and curtains fully, unless the view is a wall.
- Fans and screens: stop ceiling fans and turn off TVs and monitors.
- Bulbs: replace dead bulbs and use one bulb color per room, since mixed colors look odd (our view).
- Flash: set it to Off. Apple’s flash control switches between Auto, On and Off.
Windows are the hard part. HDR does most of the work, and the exposure lock does the rest. If a window still blows out to white, lower the exposure a touch and accept a slightly darker room (our tip).
Best time of day for listing photos
ListWithFreedom’s guide suggests shooting during the day, ideally between 10 a.m. and 2 p.m. It also says cloudy days give soft light with fewer shadows. If midday sun blows out the windows, shoot earlier or later (our tip).
For the front of the house, shoot when the sun lights the front rather than sitting behind the house, so the facade isn’t in shadow (our tip). Check which way the house faces before you set the time. A north-facing front gets little direct sun, which makes a bright overcast day a good choice.
Tip: avoid hard stripes of sun across the floor. Lower a blind halfway in that one window, or come back an hour later.
Listing photos shot list, room by room
Plan the listing photos before you arrive, so you don’t miss a room or a second angle. Photo caps vary by MLS. Canopy MLS, for example, allows 48 photos per listing.
What to shoot in each room (our shot list) and whether TINTY can virtually stage it
| Room | Shots | Angle | TINTY virtual staging |
|---|---|---|---|
| Front exterior | 2 to 3 | From the curb, phone level | No |
| Living room | 2 to 3 | Two opposite corners | Yes, if empty |
| Kitchen | 2 to 3 | Corner, plus the island or range | No |
| Bedrooms | 1 to 2 each | Corner facing the window | Yes, if empty |
| Bathrooms | 1 each | Doorway, 0.5x if small | No |
| Patio, deck or terrace | 1 to 2 | From the door looking out | Terraces only, not yards |
Outside: the front, the back and the street
Bright MLS, another regional MLS, requires at least one photo when you enter a listing, and the rest within 72 hours. Both rules are waived for Coming Soon listings or when the seller asks in writing for no photos. At least one photo must show a curbside view of the property as it appears on arrival.
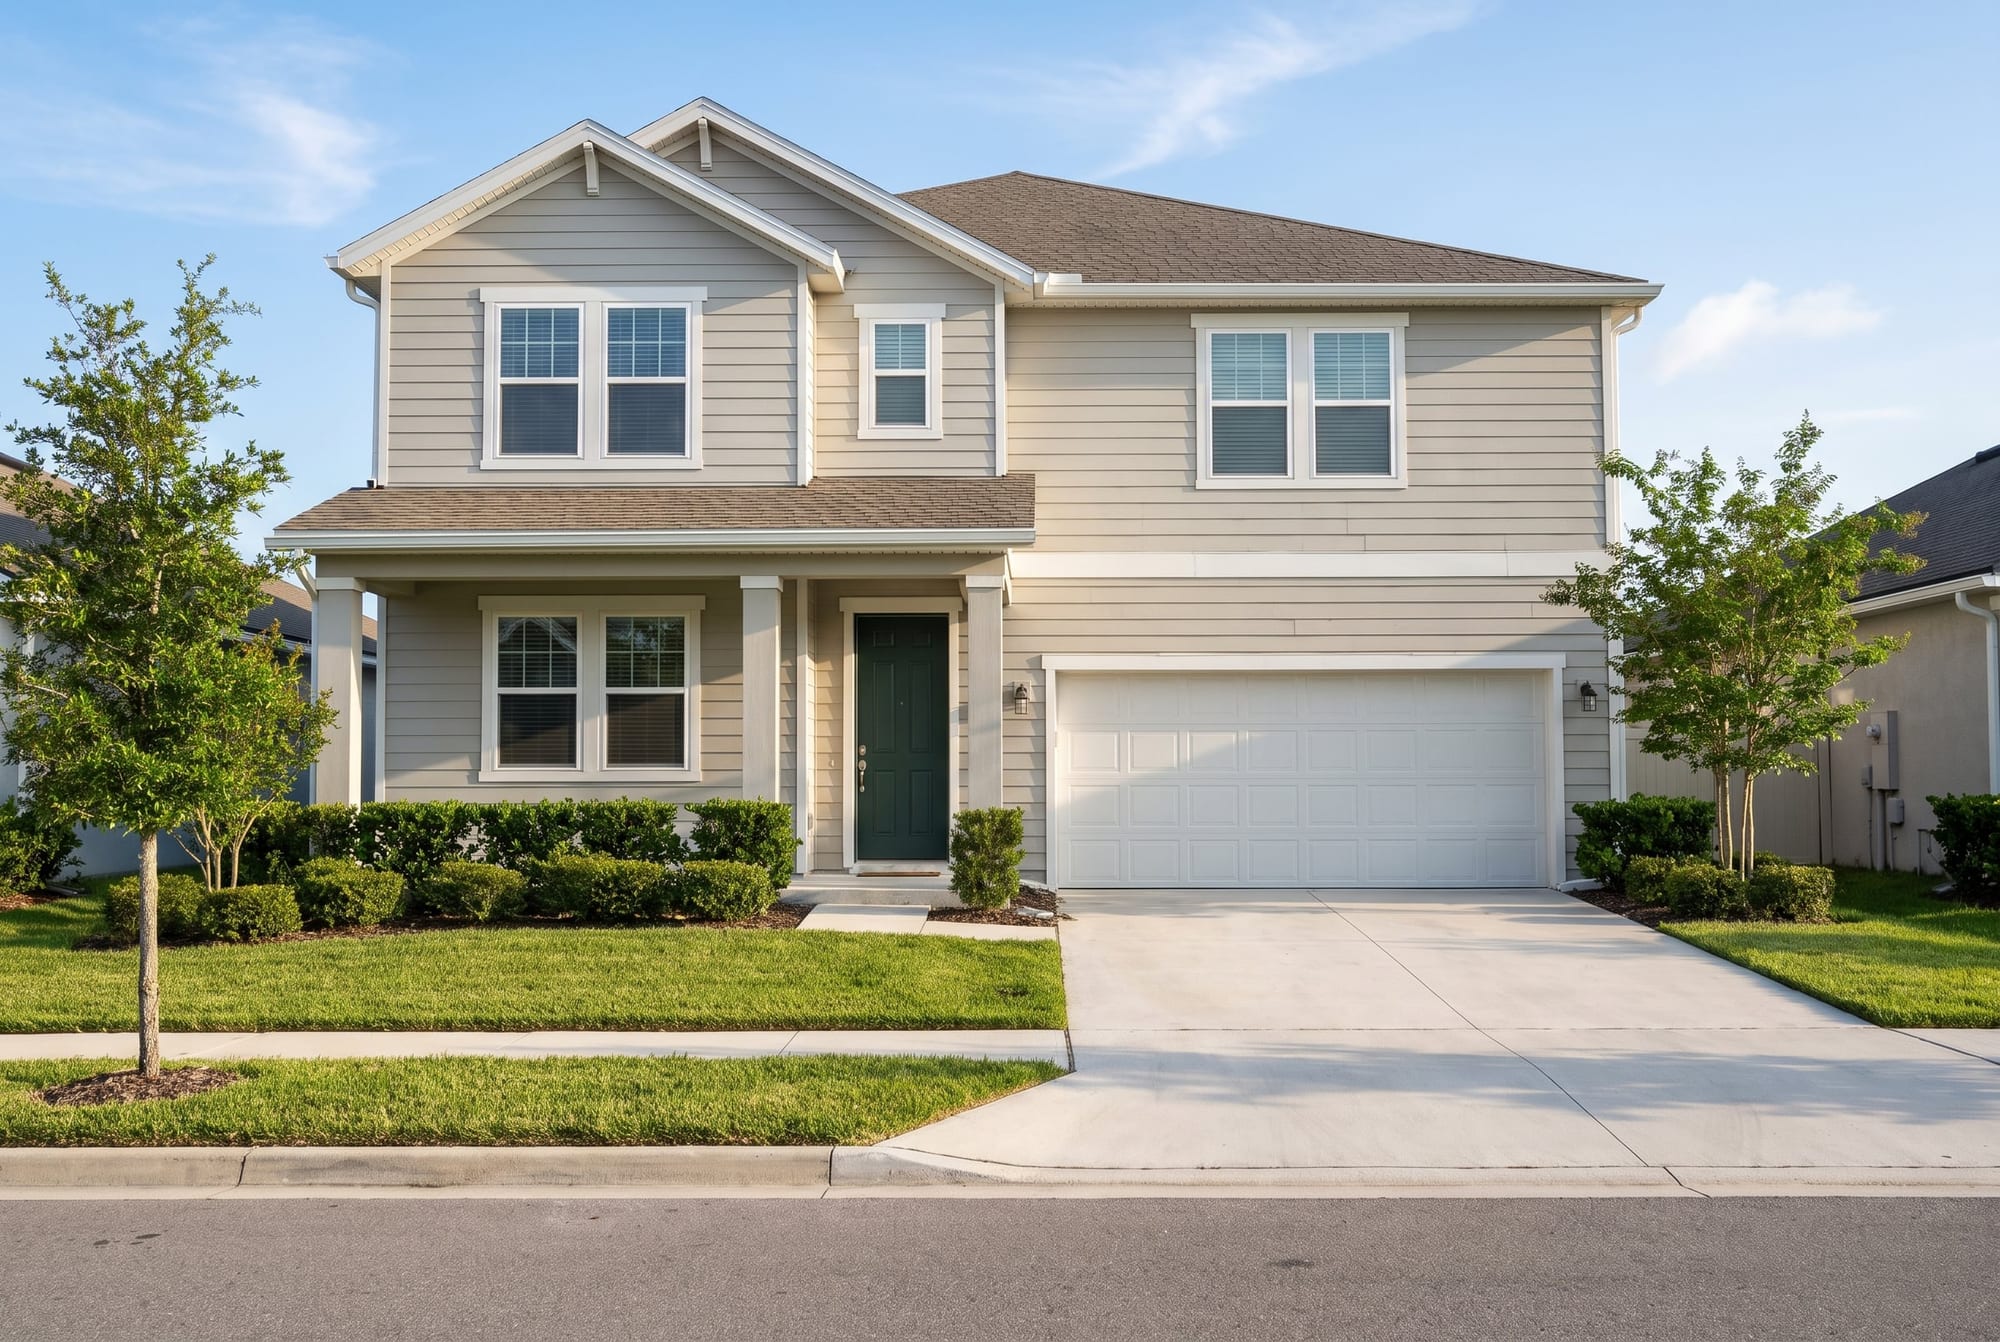
Shoot the front from the curb with the phone level, then from a front corner to show depth (our tip). Move cars, bins and hoses out of the frame first. Then shoot the backyard, deck or patio from the far corner looking back at the house.
A street view and the garage are optional. Add them when they help a buyer, such as a quiet street or a two-car garage.
Kitchen and bathrooms
Kitchens and bathrooms are normal photos. Buyers look closely at counters, cabinets and fixtures, so these rooms need real cleaning and good light (our view). TINTY doesn’t stage either room.
In the kitchen, shoot from a corner that shows the counters, cabinets and appliances together. Add one straight-on shot of the island or range. Clear the counters down to one or two items.
In bathrooms, close the toilet lid and hang one set of towels. Shoot from the doorway, at 0.5x if the room is small. Stand at an angle to the mirror so you and the phone stay out of it.
Living areas and bedrooms
Shoot the living room from two opposite corners, and include the opening to the kitchen or dining area if there is one. Buyers want to see how the rooms connect.
In bedrooms, shoot from the corner opposite the window, so the window and its light are in the frame. A second angle from the window side shows the closet wall. Add a home office, nursery or bonus room the same way.
Shooting empty rooms for virtual staging
Here’s how to take photos for virtual staging: shoot each room empty, level and wide.
Our checklist:
- Truly empty: TINTY doesn’t declutter or remove furniture, so clear boxes, ladders and leftovers first.
- Floor in frame: show plenty of floor. Furniture goes where floor is visible (our view).
- Level and straight: keep the phone level and the verticals straight, from a corner showing two walls.
- Even light: lights on, blinds open and no hard sun stripes across the floor.
- Right file: JPG, PNG or WebP up to 10 MB for TINTY’s uploader.
TINTY stages nine room types: bedroom, kids room, nursery, living room, dining room, living-dining, studio, home office and terrace. It doesn’t stage kitchens, bathrooms or building exteriors, so those stay normal photos. It also doesn’t match furniture across angles yet.
Previews take about 30 seconds and are free, with no card. Upload one empty room to TINTY’s virtual staging AI and compare the previews with the original. TINTY crops each upload to 3:2. On a 4:3 shot, you slide a box that keeps the full width and trims the top or bottom, so leave a little room there. Output is 2K, about 2,500 px on the long side in a 3:2 frame, so check how your MLS handles that shape. The “Virtually staged” label is optional: you can add it when you download. Our before and after examples show real renders, and plans are on our pricing page.
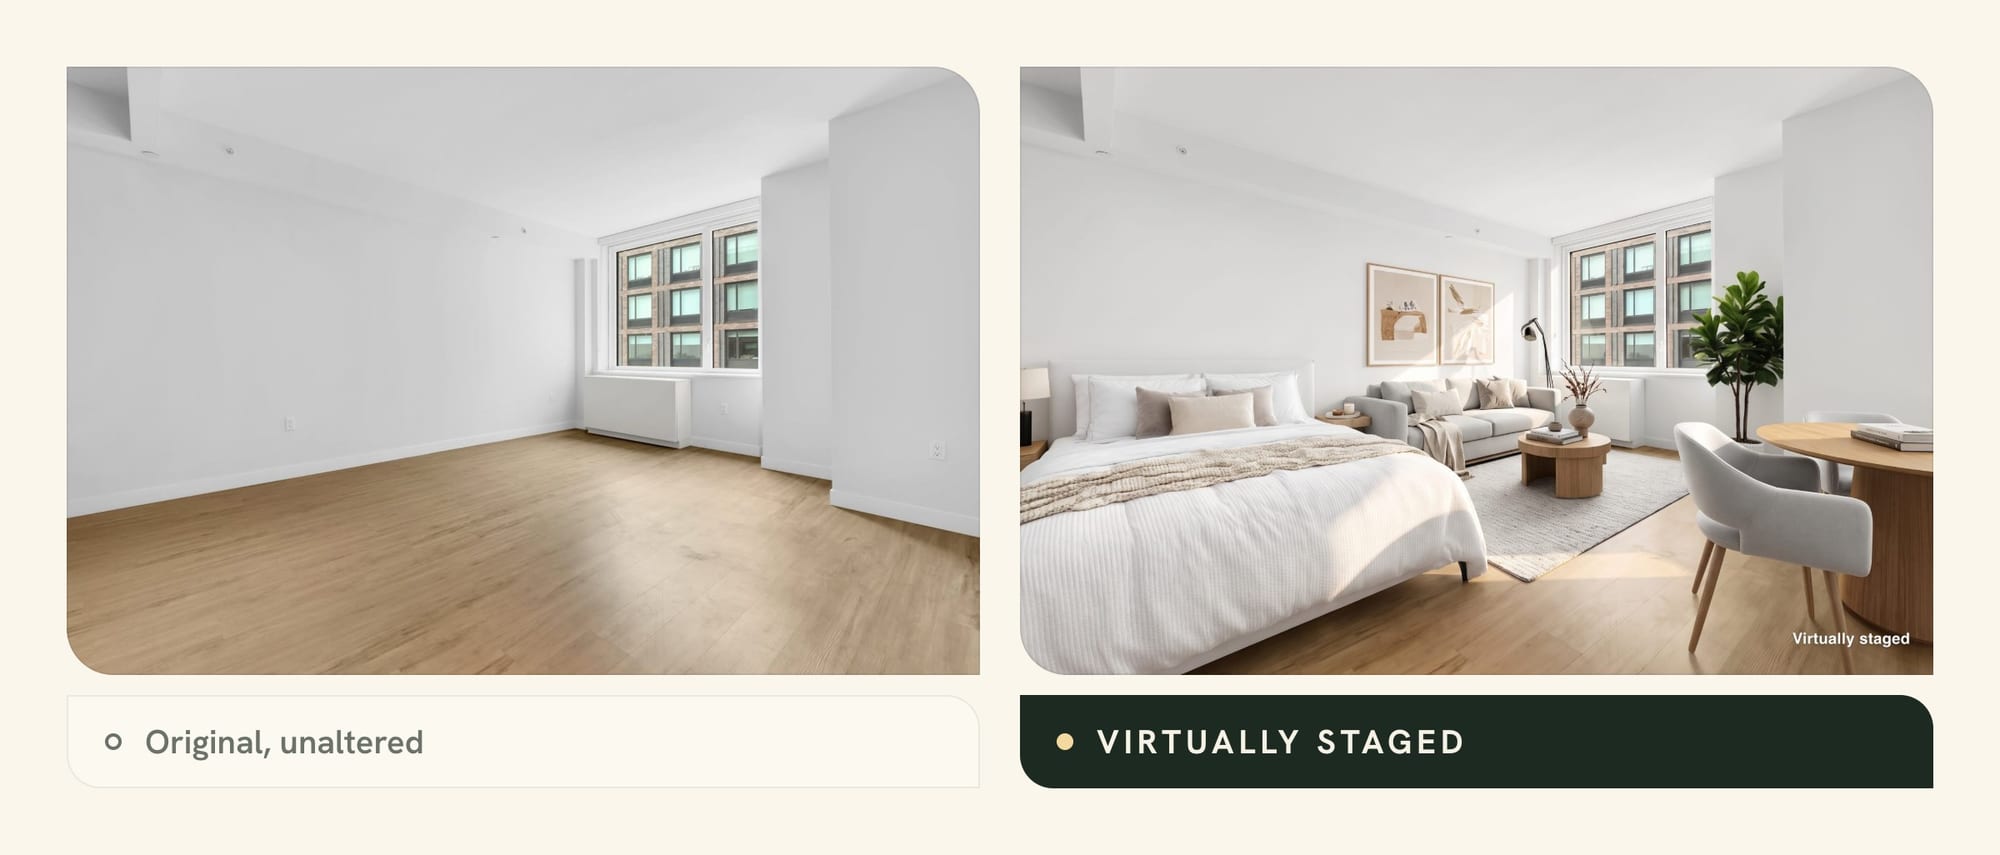
No time to stage the photos yourself, or need matching angles? Email the empty-room photos to hello@tinty.ai with the style and what each room is for. TINTY Studio, our done-for-you virtual staging service, sends them back staged in 2 to 24 hours. It’s $10 a photo from 3 photos, with no prepayment or account: you pay only if you’re happy.
Rule: California’s AB 723 has applied since January 1, 2026. An agent’s or broker’s ad with a digitally altered image must say so and link to the unaltered original. Bright MLS also requires virtually staged photos to be disclosed.
Editing iPhone real estate photos on the phone
Edit lightly, in Apple’s Photos app. The goal is a photo that matches what buyers will see when they tour.
Four edits cover most listing photos:
- Straighten: tap Edit, then Crop, then the straighten or vertical tilt button. Drag the slider until door frames stand upright.
- Brighten: tap Adjust and try Exposure, Brilliance or Highlights. Apple’s auto-enhance button is a fair starting point.
- Crop: keep the original shape. Apple’s crop tool keeps the aspect ratio when you drag a corner.
- Match the set: use Copy Edits on your best photo, then Paste Edits onto the rest of the room.
Apple says Paste Edits also adjusts white balance and exposure so the photos match better. That’s useful when one room was shot in sun and the next in shade.
Skip heavy filters, oversaturated skies and a gray, overprocessed HDR look (our view). Keep every unedited original. Under California’s AB 723, basic fixes like straightening, cropping and exposure don’t count as altering a photo. You’ll still need the original if you stage the room or remove anything later.
What you may not edit out
Removing permanent features can break MLS rules, even when an app makes it easy. On Apple Intelligence iPhones, the Clean Up tool removes “distracting objects” with a tap or a brush.
The two MLSs whose rules we read draw these lines:
- Bright MLS: no removing elements outside the owner’s control, such as power lines, water towers or nearby highways, and no adding views that aren’t possible.
- Canopy MLS: no removing anything that exists, like power lines or a cell tower, and no hiding flaws in the property.
- Labels: Canopy wants the virtual staging or AI label on the image itself, with the original placed right next to it. TINTY lets you add a “Virtually staged” label when you download.
- Furniture: both allow adding virtual furniture, as long as the photo is disclosed.
Watch out: move the car, trash can or garden hose before the shoot instead of erasing it later. Our guide to virtual staging disclosure rules covers state laws and MLS labels.
File size, orientation and MLS photo rules
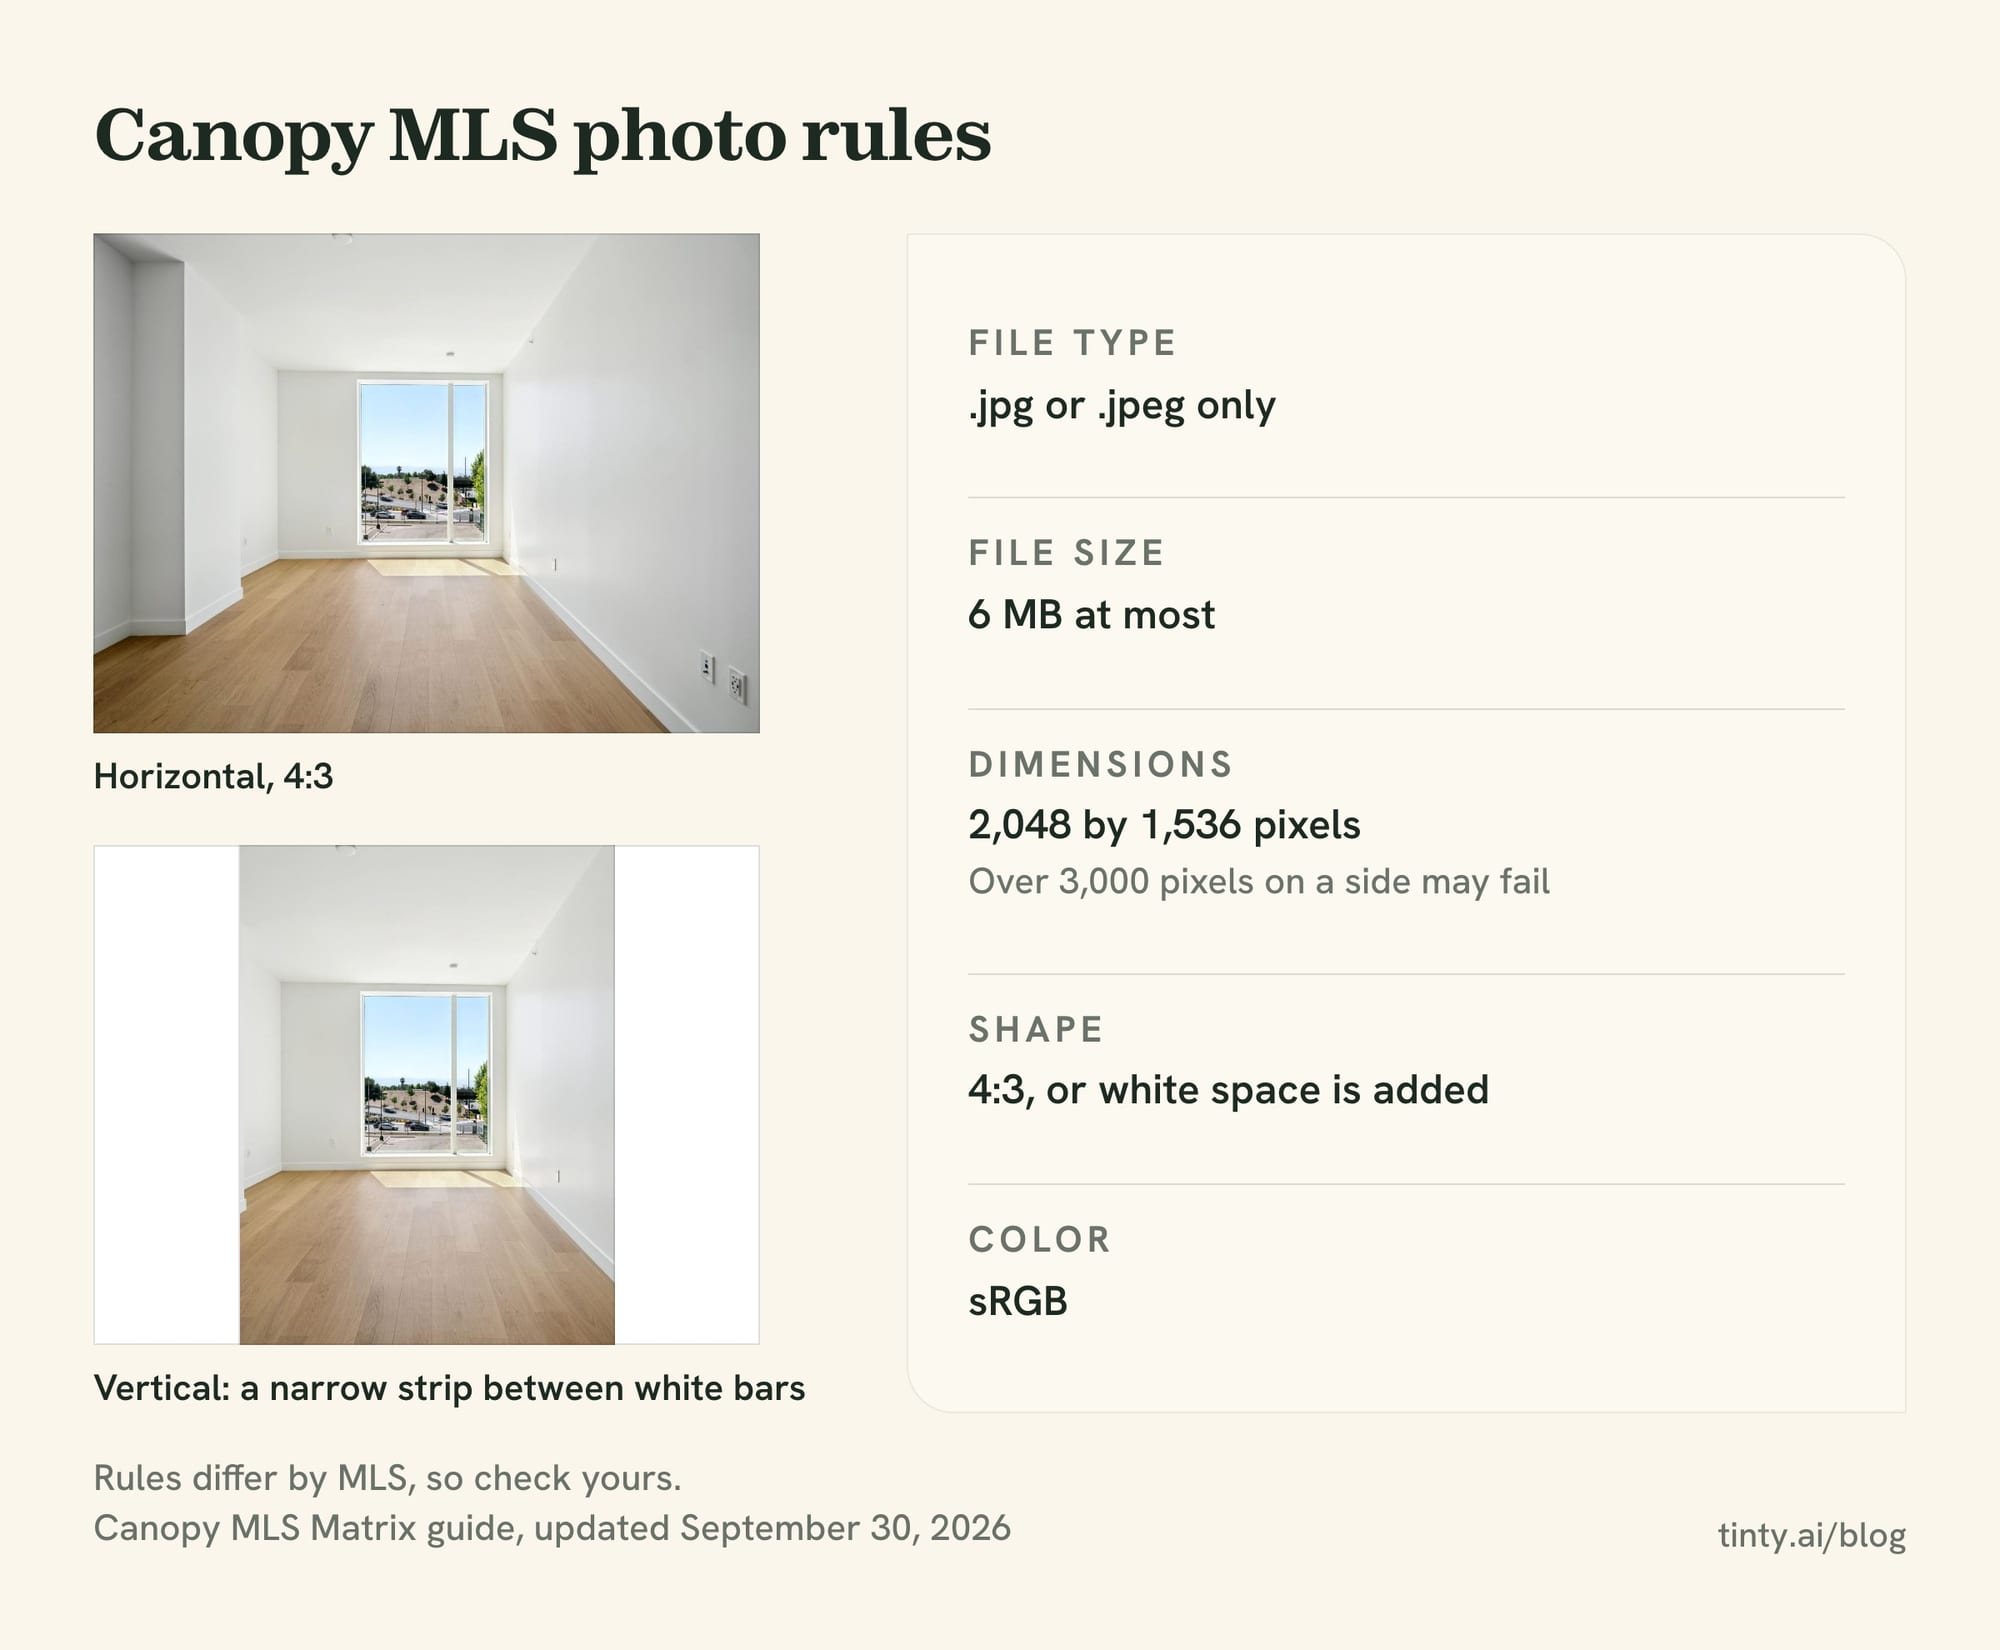
Shoot every listing photo horizontally in 4:3, and export JPEG files your MLS takes. Rules differ by MLS, so check yours. Canopy MLS’s Matrix guide, updated September 30, 2026, is the most specific we found:
- File type: .jpg or .jpeg only. PNG files are rejected.
- File size: 6 MB at most per photo.
- Dimensions: stored at 2,048 by 1,536 pixels, which Canopy calls the recommended minimum. Photos over 3,000 pixels on a side may fail to upload.
- Shape: photos that aren’t 4:3 get white space added to fill the frame.
- Color: processed in the sRGB color profile.
That white space rule is why we’d never upload a vertical photo: it would sit as a narrow strip between white bars (our reading). Apple’s Camera offers 1:1, 4:3 and 16:9 under Aspect, so keep it on 4:3.
Size is the other trap. A 12 MP photo in 4:3 is about 4,000 by 3,000 pixels (our math), so it’s already over Canopy’s 3,000-pixel line. Canopy suggests resizing copies to 2,500 pixels on the long side, and keeping the originals. Its guide gives the steps for Windows Paint and Mac Preview.
The Bright MLS pages we read set content rules, not sizes. Its listing photos can’t show identifiable people, real or computer-generated, or brokerage signs, logos or added contact details.
Tip: ask your MLS for its photo specs once, then save them as a note on your phone. Check file type, size limit, pixel limit and photo cap before your first upload.
Common iPhone listing photo mistakes
Most bad phone photos fail for the same few reasons, and each has a quick fix. Here are eight common ones, with our fix for each:
- Leaning walls: the phone tilted down. Hold it level, then fix what’s left with vertical tilt.
- Stretched rooms: 0.5x in a big room. Switch to 1x and step back into the corner.
- Dark room, white windows: exposure set on the window. Lock it on a mid-tone wall instead.
- You in the mirror: shoot bathrooms at an angle to the mirror, an issue r/realtors commenters call out.
- Blurry fans: ceiling fans left spinning. Turn them off before you shoot (r/realtors commenters flag this too).
- Toilet lid up: close it, and hide the bath mat and toiletries.
- Vertical photos: turn the phone sideways. Canopy MLS, for one, stores a horizontal 4:3 frame.
- Heavy filters: turn off styles and filters, and edit lightly.
Some problems sit outside the camera. If a listing still gets few showings after good photos go up, price or access may be the issue. Our guide to selling a stale listing covers what to try next.
When an iPhone is enough and when to hire a pro
An iPhone is often enough for small, bright homes, fixers and quick photo updates, in our view. Higher-priced, dark or awkward homes are where a pro earns the fee.
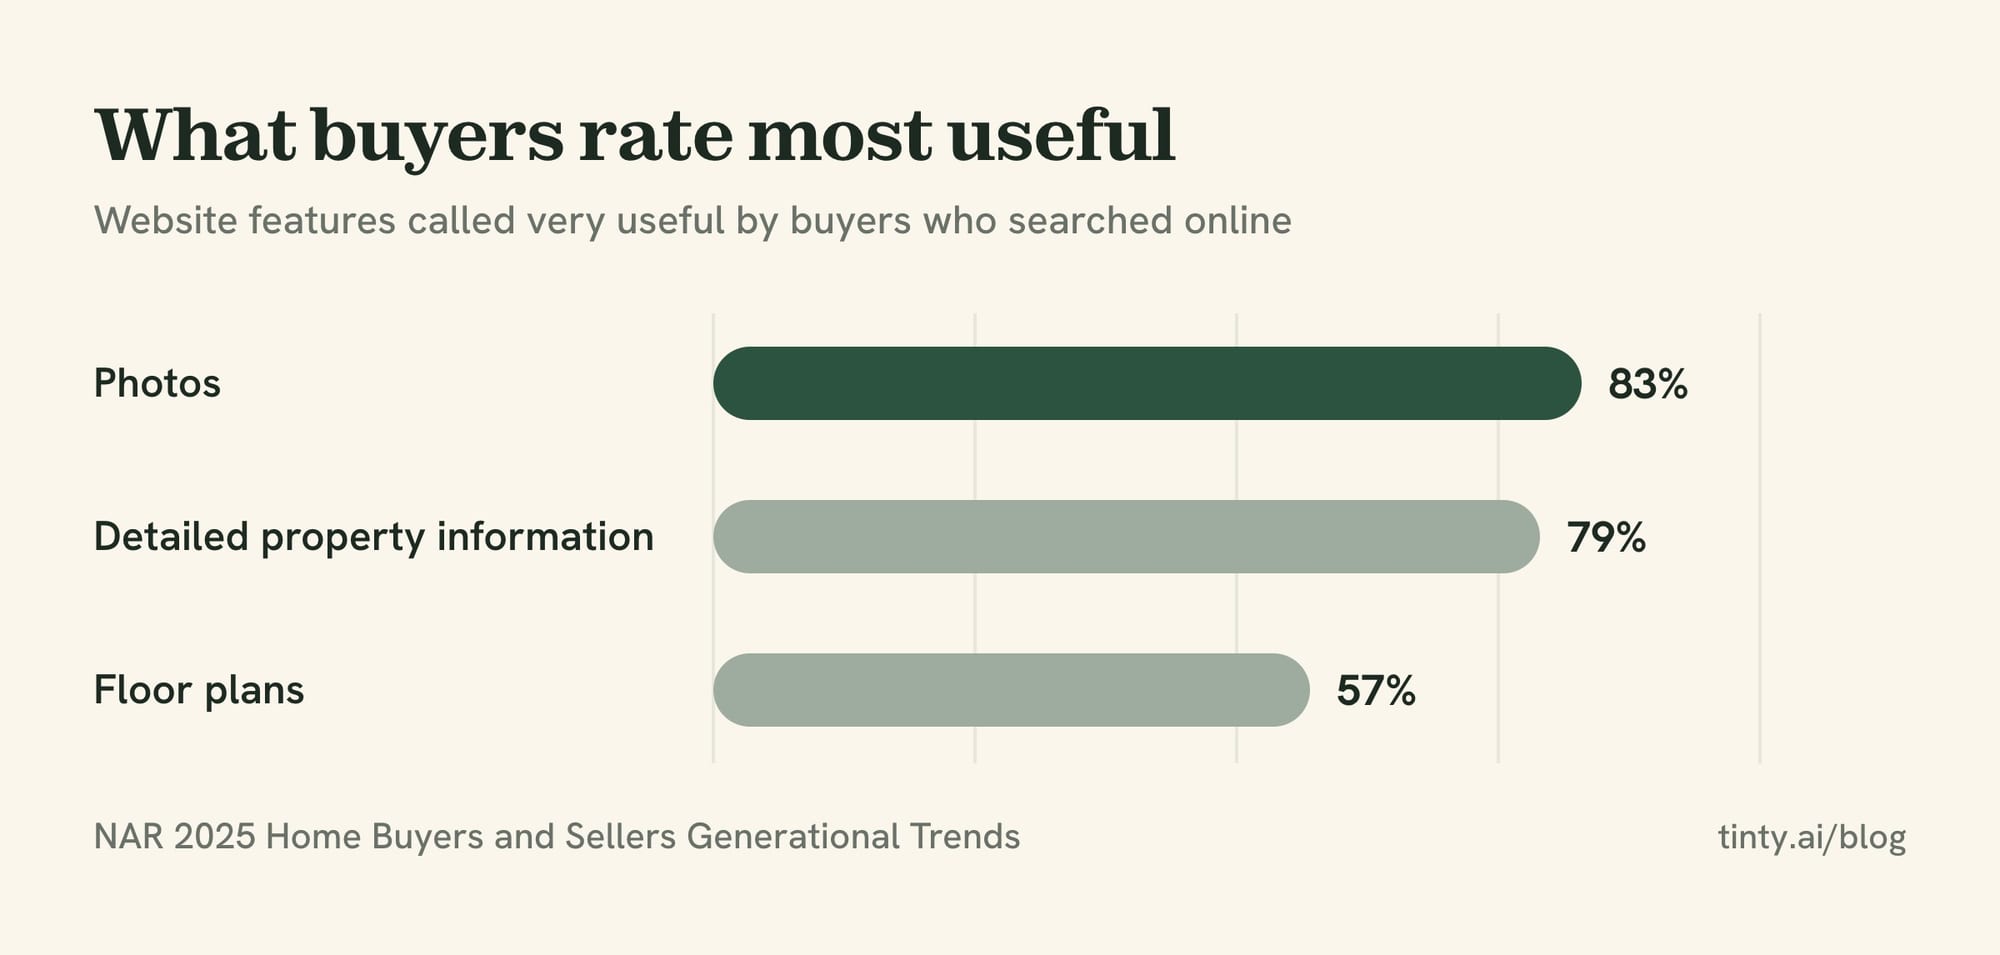
Photos are the website feature buyers rate most useful. In the 2025 Home Buyers and Sellers Generational Trends report from the National Association of Realtors (NAR), 83% of buyers who searched online called photos very useful. Detailed property information came next at 79%, then floor plans at 57%.
Sellers’ agents report the same. In NAR’s 2025 Profile of Home Staging, 88% of sellers’ agents said photos were more or much more important to their clients. Here’s where an iPhone photo can still carry that weight:
- Small, bright homes: a condo or starter home with good daylight and simple rooms.
- Fixers and as-is sales: investor specials, teardowns and gut remodels, where agents in the threads below make an exception.
- Quick updates: new paint, a new season or a price change, when only a few photos need replacing.
- Empty rooms you’ll stage: a clean, level phone photo is enough to start from. Our virtual vs physical staging guide helps you choose for each listing.
Hire a photographer for higher-priced homes, dark or awkward spaces, and anything that needs drone, twilight or video work (our view). Many agents also see pro photos as part of the service a seller pays for, as the threads below show.
What agents say about iPhone listing photos
Agents in the threads we read lean hard toward hiring a pro, with a few clear exceptions. We read three 2026 Reddit threads and their comments, and paraphrase them here.
In a January 2026 r/realtors thread on DIY photos with 115 comments, most replies said to hire a photographer. The person who asked summed up the consensus the same way. The exceptions were investor specials, hoarder homes and low-priced listings. A brokerage marketing staffer in a small southern Indiana town said many of its agents skip a photographer below $150,000.
In a March 2026 r/realtors thread on dropping the $300 photographer, the top reply said DIY photos never match a skilled photographer. Others pointed to the phone’s smaller sensor in dim rooms, and to the skill behind composition, light and editing.
Example: in that thread, one agent in a low-cost area said they would shoot their own listings. Their usual commission check is about $2,000, and they used to be a photographer. Another said photos also market the agent to future sellers. One post isn’t data, but it shows the trade-off agents weigh.
Photographers argue about it too. In an August 2026 r/RealEstatePhotography thread, one poster said they had moved all their photo and video work to an iPhone 17 Pro Max. Most replies were skeptical and asked to see the work. One photographer said they use an iPhone for the odd photo in tight rooms, and that nobody notices when the room is well lit.
iPhone real estate photos FAQ
Can you take good real estate photos with an iPhone?
Yes, for many listings, if you control the light, the height and the level. Turn on every light, hold the phone level at about chest height and shoot from corners. Most agents in the Reddit threads we read still prefer a pro photographer, especially for higher-priced homes.
Should you use 0.5 or 1x for real estate photos?
Use 1x wherever the room allows, and 0.5x only in small rooms such as bathrooms and closets. The ultra-wide stretches objects near the edges. Leave Lens Correction on, which Apple says makes Ultra Wide photos look more natural.
Show 6 more questionsShow fewer questions
How do you make a room look bigger in real estate photos?
Shoot from a corner that shows two walls, the floor and a window, and keep the phone level. Step back at 1x before you switch to 0.5x, and use the ultra-wide only in small rooms. Add a floor plan so buyers aren’t surprised at the tour.
How high should you hold the camera for real estate photos?
About chest height is a good default. ListWithFreedom’s guide puts it at about 4 to 5 feet, while HDRsoft’s guide says about belly high. Go lower in small rooms, and keep the phone level so walls don’t lean.
What time of day is best for real estate photos?
Guides differ. ListWithFreedom’s guide suggests 10 a.m. to 2 p.m. and says cloudy days give soft light. If sun stripes the floor or blows out a window, wait an hour. Shoot the front when the sun lights it, not from behind the house.
Should real estate photos be horizontal or vertical?
Horizontal, in a 4:3 frame. Canopy MLS, one MLS we checked, stores photos at 2,048 by 1,536 pixels and pads other shapes with white space. A vertical photo would sit small between white bars. Check your own MLS’s specs.
Can I virtually stage photos taken on an iPhone?
Yes. TINTY accepts JPG, PNG or WebP files up to 10 MB, so if your iPhone saves HEIF files, switch Formats to Most Compatible before the shoot. It works best on empty rooms shot level from a corner, with plenty of floor in frame. TINTY doesn’t stage kitchens, bathrooms or building exteriors.
Do you need ProRAW for listing photos?
Usually not, because the files are huge. Apple puts a ProRAW photo at about 25 MB at 12 MP and 75 MB at 48 MP, over Canopy MLS’s 6 MB cap. JPEG from the Most Compatible setting is simpler. Use ProRAW only if you plan to edit each photo in depth.
How we researched this
On October 6, 2026, we read Apple’s iPhone User Guide pages on camera settings, camera tools, HDR, macro, editing, cropping and Clean Up. The guide covered iOS 27 that day. We also read Apple’s articles on HEIF and ProRAW, Bright MLS’s photo rules and policy, and Canopy MLS’s Matrix photo guide.
Photo statistics come from two 2025 NAR reports. We read the pages ranking for “how to take real estate photos with iphone” and cite four of the iPhone guides among them. A Facebook group post ranking for this topic needs a login, so we didn’t use it.
We didn’t test these settings ourselves. They come from Apple’s guide, and menus vary by model and iOS version. TINTY facts come from our live pages, checked October 6, 2026. If something here is wrong, email hello@tinty.ai and we’ll fix it.
Sources
All pages read October 6, 2026, unless a date is given.
Apple iPhone User Guide and support articles:
- Use iPhone camera tools to set up your shot (grid and level, focus and exposure, AE/AF Lock, flash, timer, aspect ratio)
- Change advanced camera settings on iPhone (Lens Correction, resolution, lens cleaning hints)
Show 19 more sourcesShow fewer sources
- Adjust HDR camera settings on iPhone
- iPhone camera basics and Take macro photos and videos (zoom and the .5x Ultra Wide camera)
- About Apple ProRAW and Using HEIF or HEVC media on Apple devices
- Crop, rotate, flip, or straighten photos and videos on iPhone, Edit photos and videos on iPhone and Clean up, extend, and reframe photos on iPhone
MLS rules and disclosure:
- Canopy MLS: Matrix Listing Images, Instructions and common questions (last updated September 30, 2026)
- Bright MLS: Bright’s Photo Requirements (June 1, 2026)
- Bright MLS: Policy on Images and Documents in the MLS (PDF) (February 28, 2024)
- California Business and Professions Code §10140.8 (AB 723) (checked October 6, 2026)
Survey data:
- NAR 2025 Home Buyers and Sellers Generational Trends (PDF) (April 2025; Exhibit 3-6, page 56; 5,390 buyers who bought from July 2023 to June 2024)
- NAR 2025 Profile of Home Staging (PDF) (May 2025; 1,266 responses)
iPhone photo guides:
- HDRsoft: Tips for taking professional real estate photos with your iPhone (undated)
- AHRN: How to take great real estate photos with an iPhone (updated July 10, 2023)
- ListWithFreedom: How to take great listing photos using just your iPhone (September 23, 2025)
- BoxBrownie: iPhone photography, how to shoot real estate on a budget (March 3, 2025)
Agent and photographer threads:
- r/realtors: As a real estate agent, do you normally take your own photos or hire a photographer? (January 5, 2026)
- r/realtors: Would you ditch $300 photographer if iPhone photos looked as good? (March 20, 2026)
- r/RealEstatePhotography thread on using an iPhone for all real estate photo work (August 24, 2026)
TINTY and related guides: